
Free Pattern
Step-by-Step
Crochet
Granny SquaresCozy Cottage Granny Square — A Tiny Thatched-Roof Charmer
A beginner-friendly granny square with a sweet cottage appliqué, worked in four rounds of cream, sage, and warm brown, finished with a cheerful border.
Level BeginnerTime 45-60 MinutesHook 5.0 mmYarn Worsted
About This Pattern
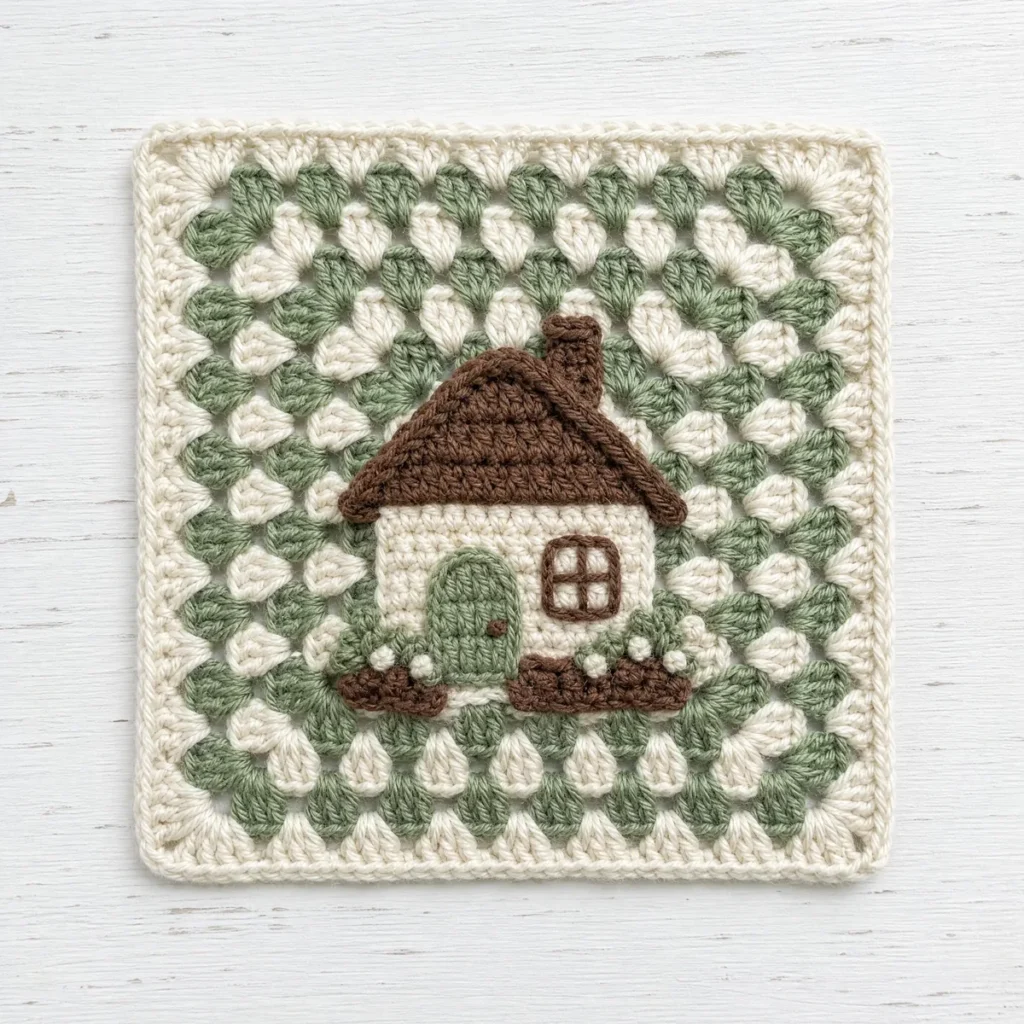
The Cozy Cottage Granny Square starts as a classic four-round granny base, worked in cream, sage, and warm brown with the familiar corner clusters and chain spaces that make granny squares so satisfying to build. What sets it apart is the little scene stitched separately and set onto that base: a tiny cottage with its own body, a thatched roof, a painted door, a curl of chimney smoke, and a small bush tucked beside it, so the finished square reads like its own little postcard.
You'll lean on the same core granny square skills throughout, magic ring, chaining into corners, and joining rounds with a slip stitch, plus a bit of simple piecing to attach the cottage shapes once your background rounds are done. That combination makes it a lovely project for a beginner who already knows the granny square basics and is ready for a little extra charm, without needing any techniques beyond what a classic square already asks for.
Blocked and finished, the square settles in at about 6 x 6 inches, sized to join easily into a blanket, a pillow front, or a set of garden squares. It's especially fun worked in multiples, since a whole row of cottages in slightly different colors starts to look like its own tiny village stitched square by square.
Variations
Once you've got the cottage down, this square is wonderful to play with. Swap the sage for a dusty blue roof and you've got a lakeside cabin instead of a garden cottage, or try a deep forest green with a red door for something a little more autumn. A fingering weight version with a smaller hook makes a sweet ornament-sized square for a garland, while doubling up on worsted with a bigger hook turns it into a bold statement block for a quick throw. You could also stitch a whole row of cottages in slightly different color combinations, cream and terracotta, oatmeal and denim, to build a little painted village across one blanket.
I fell for this square the moment I stitched that little curl of smoke above the chimney. There's something about a tiny thatched roof and a painted door that turns a simple set of granny rounds into a whole scene, and I love how the classic corners still do all the structural work while the cottage pieces just perch on top, easy as pie. It's forgiving too — if your door sits a stitch off center or your bush leans a touch to one side, it only adds to the handmade charm. I keep coming back to this one whenever I want a square that tells a story, not just fills a space, and cream, sage, and warm brown feel like home every single time.
Common mistakes
- Skipping the corner stitch count
- Miscounting stitches in a corner throws off every round after it, so pause and count each corner group before moving on.
- Pulling the door too tight
- A tightly stitched door or window can pucker the background square, so keep your appliqué tension as relaxed as your base rounds.
- Losing track of round joins
- Forgetting where you slip-stitched to join makes the next round's corner placement confusing, so mark your starting corner with a stitch marker.
- Rushing the color changes
- Cutting yarn too close to a color change can leave a gap at the join, so leave a longer tail and weave it in snugly once the square is done.


Beginner
Materials
- Worsted-weight yarn in 3 colors (cream, sage, warm brown) — about 25–40 g total per square
- 5.0 mm crochet hook
- Yarn needle for weaving in ends
- Scissors
The Background Square
Work the plain background square first — the cozy cottage pieces are sewn on at the end. Every count below is math-verified.
- Round 1With cream, in a magic ring: ch 3, 2 dc, ch 2, [3 dc, ch 2] 3 times; sl st to top of ch-3 to join (12)Step by step Step by step: Using cream yarn, in a magic ring: make 3 chain stitches, 2 double crochet, make 2 chain stitches, [3 double crochet, make 2 chain stitches] 3 times; slip stitch to top of ch-3 to join.
- Round 2sl st to corner sp, ch 3, 2 dc, ch 2, 3 dc in same corner, ch 1, [(3 dc, ch 2, 3 dc) in corner sp, ch 1, ] 3 times; sl st to join (24)Step by step Step by step: Slip stitch to corner space, make 3 chain stitches, 2 double crochet, make 2 chain stitches, 3 double crochet in same corner, make 1 chain stitch, [(3 double crochet, make 2 chain stitches, 3 double crochet) in corner space, make 1 chain stitch, ] 3 times; slip stitch to join.
- Round 3With sage, sl st to corner sp, ch 3, 2 dc, ch 2, 3 dc in same corner, ch 1, 3 dc, ch 1, [(3 dc, ch 2, 3 dc) in corner sp, ch 1, 3 dc, ch 1, ] 3 times; sl st to join (36)Step by step Step by step: Using sage yarn, slip stitch to corner space, make 3 chain stitches, 2 double crochet, make 2 chain stitches, 3 double crochet in same corner, make 1 chain stitch, 3 double crochet, make 1 chain stitch, [(3 double crochet, make 2 chain stitches, 3 double crochet) in corner space, make 1 chain stitch, 3 double crochet, make 1 chain stitch, ] 3 times; slip stitch to join.
- Round 4sl st to corner sp, ch 3, 2 dc, ch 2, 3 dc in same corner, ch 1, 3 dc, ch 1, 3 dc, ch 1, [(3 dc, ch 2, 3 dc) in corner sp, ch 1, 3 dc, ch 1, 3 dc, ch 1, ] 3 times; sl st to join (48)
Step by step Step by step: Slip stitch to corner space, make 3 chain stitches, 2 double crochet, make 2 chain stitches, 3 double crochet in same corner, make 1 chain stitch, 3 double crochet, make 1 chain stitch, 3 double crochet, make 1 chain stitch, [(3 double crochet, make 2 chain stitches, 3 double crochet) in corner space, make 1 chain stitch, 3 double crochet, make 1 chain stitch, 3 double crochet, make 1 chain stitch, ] 3 times; slip stitch to join.
- BorderWith cream, sl st into the corner ch-2 sp, ch 1, [3 sc in the corner sp, (sc in next 3 sts, sc in next sp) 3 times, sc in next 3 sts] 4 times; sl st to the first sc (72)Step by step Step by step: Using cream yarn, slip stitch into the corner ch-2 space, make 1 chain stitch, [3 single crochet in the corner space, (single crochet in next 3 stitches, single crochet in next space) 3 times, single crochet in next 3 stitches] 4 times; slip stitch to the first single crochet.
The Body
Worked in cream. Leave a long tail for sewing.
- Round 16 sc in a magic ring (6)
- Round 2[inc] repeat 6 times (12)
- Round 3[sc, inc] repeat 6 times (18)
- Round 4[sc in next 2 sts, inc] repeat 6 times (24)
The Roof
Worked in warm brown. Leave a long tail for sewing.
- Round 1ch 11, sc in 2nd ch from hook, sc in next 9 sts (10)
- Round 2ch 1, turn, dec, sc in next 6 sts, dec (8)
- Round 3ch 1, turn, dec, sc in next 4 sts, dec (6)
- Round 4ch 1, turn, dec, sc in next 2 sts, dec (4)
- Round 5ch 1, turn, dec, dec (2)
- Round 6ch 1, turn, dec (1)
The Door
Worked in sage. Leave a long tail for sewing.
- Round 1ch 4, sc in 2nd ch from hook, sc in next 2 sts (3)
- Round 2ch 1, turn, sc in next 3 sts (3)
- Round 3ch 1, turn, sc in next 3 sts (3)
The Chimney
Worked in warm brown. Leave a long tail for sewing.
- Round 1ch 3, sc in 2nd ch from hook, sc in next ch (2)
- Round 2ch 1, turn, sc in next 2 sts (2)
- Round 3ch 1, turn, sc in next 2 sts (2)
The Bush
Worked in sage. Leave a long tail for sewing.
- Round 16 sc in a magic ring (6)
- Round 2[inc] repeat 6 times (12)
Assembly — Bringing It Together
Step 1 Pin the Body rectangle in the center of the background square, roughly 1 inch up from the bottom edge
Step 2 Set the Roof triangle point-up directly above the Body so its bottom edge overlaps the top row of the Body by about a half stitch, then sew both long edges in place
Step 3 Center the Door on the lower half of the Body, aligned with the bottom row, and sew around all edges
Step 4 Tuck the Chimney against the upper right slope of the Roof, slightly overlapping the roofline, and sew in place
Step 5 Sew the Bush at the bottom left corner of the Body so it hugs the base of the house
Step 6 Add the window cross-stitch above and to the left of the door, then the doorknob and chimney smoke embroidery to finish
Embroidery Work a small cream straight-stitch cross on the upper body for a window
Embroidery Add a tiny warm brown French knot on the door for a doorknob
Embroidery Chain-stitch a curl of cream 'smoke' rising above the chimney
Important notes
💡 Gauge: the finished square is about 6 x 6 inches in Worsted weight yarn with a 5.0 mm hook. Tight crocheters can go up half a hook size; loose ones down half.
💡 Color plan: the sample uses cream, sage, warm brown in round order — change colors with a slip-stitch join in the first stitch of the new round.
💡 Block your square lightly before sewing on the cottage pieces so the appliqué sits flat and even.
💡 Pin the cottage shapes in place and step back before you sew, since a slightly crooked chimney is much easier to fix while it's just pinned.
FAQ
Do I need to know appliqué to make this square?
Not really — the cottage pieces are small, simple shapes, and sewing them on is just a few whip stitches once your granny square base is done. If you've ever sewn in a yarn end, you already have the skill you need.
What size hook and yarn does this pattern use?
This square is worked in worsted weight yarn with a 5.0 mm hook, which keeps the stitches easy to see and count, especially helpful for a beginner project like this one.
How big is the finished square?
Once blocked, the Cozy Cottage Granny Square comes out to about 6 x 6 inches, a comfortable size for joining into blankets, pillows, or a whole row of little houses.
Can I use different colors than cream, sage, and warm brown?
Absolutely, this palette is just where I started. The cottage shapes read clearly in almost any combination, so feel free to match it to your own color story.
Is this square good for a first-time granny square maker?
Yes, it's a great beginner pick. The base rounds use the same classic corners and joins found in traditional granny squares, and the cottage appliqué is added afterward with simple, forgiving stitches.
Made your own square?
This site belongs to every crocheter. Share your design with the world — we’ll math-check the counts, polish it up, and publish it free for everyone, credited to you.
🧵 Share your pattern →
0 / 0 rounds