
Free Pattern
Step-by-Step
Crochet
Granny SquaresCute Dragon Granny Square – Free Crochet Pattern
Crochet a cute dragon granny square with BLO texture, hdc increases and tiny 3D ears. Free pattern makes a 3.35-inch square for blankets
Level IntermediateTime 1-2 HoursHook 3.00 mmYarn DK
About This Pattern
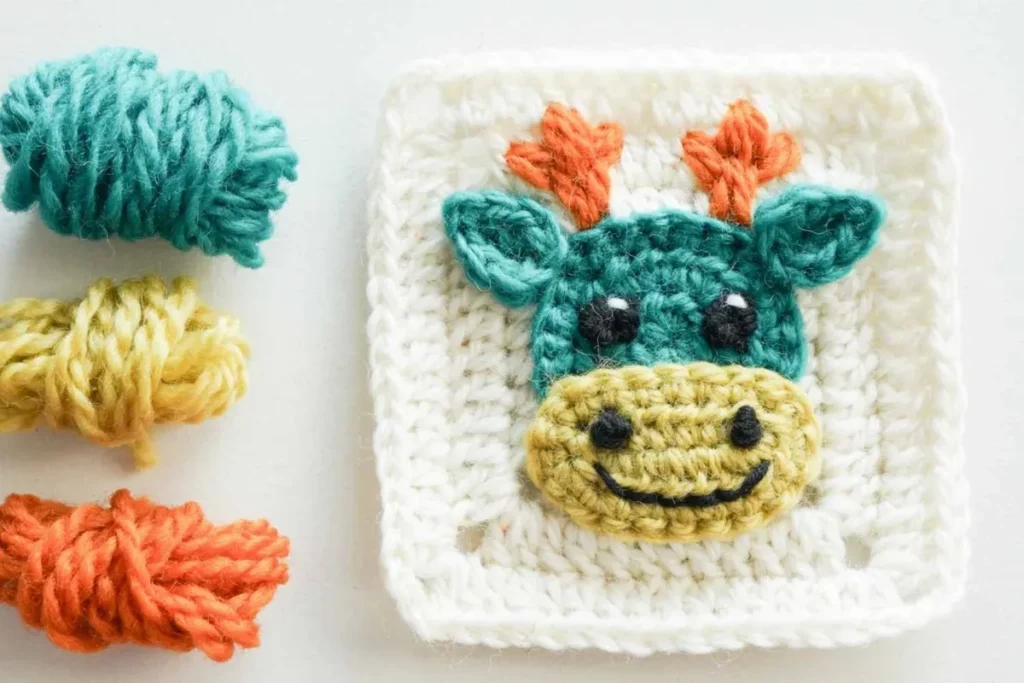
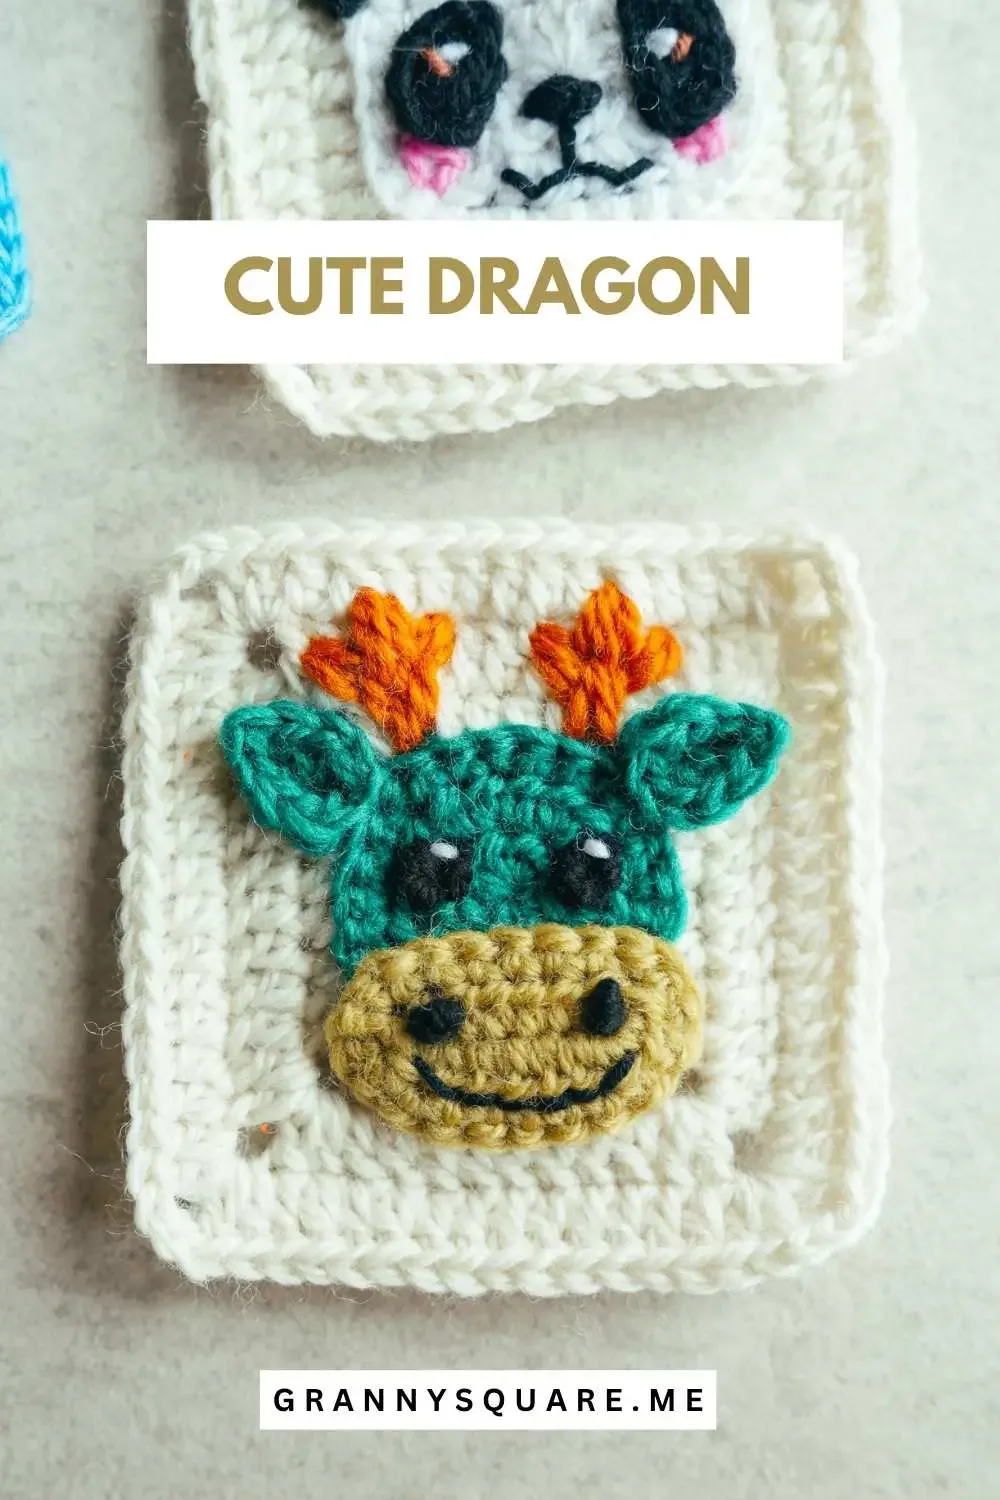
This pattern turns a humble circle into a pint-sized dragon face that lives inside a perfect granny square. You begin with a magic loop and grow the head over three quick rounds of hdc and sc increases, then flip everything to the wrong side and square it off in back loops only. The result is a tidy 3.35 x 3.35 inch block with a raised dragon silhouette. It's ideal for anyone who loves character squares but wants something faster and flatter than full amigurumi
The techniques here are the friendly kind of intermediate. You'll work a magic loop, hdc increases, sc increases, dc increases at the corners, and standard ch-3 corner spaces, plus one clever trick: turning the piece over and working in BLO so the transition round pops into a visible ridge. The muzzle is a small two-round oval worked into both sides of a foundation chain, and the ears are quick shaped pieces. Most crocheters finish a square in one to two hours
Made in wool with a 3.00 mm hook, each finished square lands right around 3.35 inches on every side, which makes them beautifully modular. The face sits slightly proud of the background thanks to the BLO ridge, so the dragon reads clearly even from across a room. Six colors means you can give every dragon its own personality. They stitch up into blankets, cushion fronts, tote panels, bunting, or a single patch sewn onto a hoodie pocket for a gift that gets noticed
This cute dragon is a simpler take on the more complex dragon granny square. It skips the intricate hair and whiskers and features a sweet, friendly face, making it much more suitable for beginners. You start with a simple circle granny square to form the head, crochet the ears and muzzle appliques separately, attach them securely, then add the tiny facial details to bring out its personality. Combine several of these dragon squares to make soft baby blankets or cozy pillows
Variations
Color is where this dragon really comes alive, and six colors gives you a lot of room to play. For a classic storybook look, try a moss-green head with a cream muzzle, a soft butter-yellow background, and deep forest ears. For something modern, go tonal: three shades of dusty blue for head, muzzle and ears, with a warm oatmeal background so the BLO ridge does all the talking. Baby-nursery palettes work beautifully too, with a blush-pink dragon on mint and a white background. Want to change the size? The square scales cleanly by adding more repeats of Round 5. Each extra round adds one dc on each side plus the corner cluster, so one additional round takes you from about 3.35 inches to roughly 4.25 inches with the same 3.00 mm hook. Going the other way, stop after the first squaring round for a mini 2.5-inch version that's perfect for bunting or a keyring. Yarn substitutions are simple. Scheepjes Catona or Paintbox Cotton DK in a 3.00 mm hook keeps the stated size and gives crisp stitch definition. Swap to worsted acrylic like Super Saver with a 4.00 mm hook and each square grows to about 4.5 inches, which makes a blanket come together fast. Seasonally, a red dragon with gold ears reads festive, a pale ice-blue dragon with white ears makes a winter frost version, and an orange dragon on a charcoal background is pure autumn. Try one square in every color of a mini skein set and let the whole blanket be a dragon rainbow
I fell for this one the moment I flipped the head over and started the BLO round. That single move is what makes the whole design work. Instead of the face melting into the background, the back loops create a crisp raised outline, and suddenly you're looking at a dragon and not just a circle in a square. It feels like a magic trick you performed with your own hands. I also love how honest the construction is. Three rounds of increases give you the head, one transition round with dc increases and ch-3 corners squares it off, and two rounds of plain dc with corner clusters bring it to size. Nothing fussy, nothing that needs unpicking at midnight. The muzzle is my favorite little detail. Working 4hdc into the first chain and then coming back along the unused front loops gives you a proper oval, not a lumpy blob, and once it's stitched on, the dragon gets an actual expression. And because the square finishes at 3.35 inches, you can knock one out in an evening and still feel like you made something real
Common mistakes
- Forgetting that the ch2 at the start of
- Every time you chain 2, mentally label it as your first hdc and place a stitch marker in it. In Round 2 the pattern is explicit: you ch2, then work 1hdc in that SAME stitch to complete the first increase. If you add a separate hdc beside it, you'll end Round 2 with 17 or 18 stitches instead of 16, and Round 3's [sc inc, 1sc] repeat won't land evenly
- Working the squaring round on the right
- After Round 3 is fastened off, physically flip the head over before joining new yarn. The whole point of the design is that the squaring round is worked from the wrong side in BLO, which throws the ridge to the front. If you skip the flip, the ridge lands on the back and your dragon face will look flat and blurry. Check by looking for the raised outline before you go on to Round 5
- Working in both loops instead of BLO on the transition round
- the round that starts with ch3 and dc inc, only the back loop of each stitch gets used. It's easy to slip back into both loops after a few stitches out of habit. Slow down for the first ten stitches and look for the front loops sitting free and untouched below your hook. If you see them disappearing under your stitches, you've caught both loops and it's worth ripping back
- Joining rounds with a slip stitch when
- Rounds 4 and 5 end with ch1 then 1hdc into the top of the beginning ch3 rather than a slip stitch. That hdc join is what parks your hook right in the middle of the corner space so Round 5 can start with ch3 and 1dc in the same corner. Slip stitching instead leaves you at the side of the corner and your corners will drift out of alignment by Round 6
- Making the muzzle flat and lopsided
- The muzzle is worked around both sides of the ch-8. You chain 8, come back skipping 2 chains, work 5hdc in BLO, then place 4hdc in the very first chain near the knot to turn the corner, and only then work back along the unused front loops. Missing that 4hdc turn or working the return into the wrong loops gives you a flat strip instead of an oval, and the dragon ends up with a snout that won't sit right
- Sewing the muzzle and ears on before blocking the square
- Blocking the square flat first sets the BLO ridge and the corners, and gives you an accurate 3.35 inch canvas to position the pieces on. If you sew first, the pieces shift and pucker when the square relaxes. Pin the muzzle and ears in place, look at the square from a few feet away to check the face reads correctly, then sew with the darning needle using small whip stitches in matching yarn


Intermediate
Materials
- Yarn of Your Choice-6 Colors. The sample is made with wool yarn and a 3.00 mm hook. The finished granny square measures approximately 3.35 × 3.35 inches
- Crochet Hook - we used a 3.00 mm hook
- Darning Needle
- Scissors
- Black yarn for the French knot eyes and nostrils, and white yarn for the eye highlights
Main Pattern
Background with head base: we will finish the head in three rounds, then square it off using BLO on the wrong side to make it pop.
- Round 1Foundation round Magic loop, ch2 (count as 1hdc), 7hdc, slst to the top of the first ch2.
- Round 2The head Ch2 (count as 1hdc), 1hdc in the same st to finish the first hdc inc, hdc inc in each st around, slst to the top of the first ch2.
- Round 3Enlarge the head Ch1 , sc inc in the same st, 1sc . Repeat [sc inc, 1sc] around, slst to the first sc, then fasten off.
- Round 4Squaring Turn over to the wrong side , work in BLO . Join new yarn in any st, ch3 (count 1dc), 1dc in the same st to complete a dc inc, 4hdc, dc inc, ch3 . [dc inc, 4hdc, dc inc, ch3] repeat 3 times, omit the final ch3. Instead, work ch1 , then 1hdc into the top of the first ch3 to join and keep the hook in the corner.
- Round 5Second border Ch3 to begin (count as 1dc), 1dc in the same corner. Work 1dc in each st around, (2dc+ch3+2dc) in each corner as you go. When you return to the starting corner, work 2dc , join with ch1, 1hdc into the top of the beginning ch3.
- Round 6Final border For Round 6: Work as Round 5 for sides and corners. When you return to the starting corner, work 2dc+ch3 , then slst to the top of the first true dc. Fasten off.
Muzzle
Create a two-round oval by working hdc along both sides of a foundation chain.
- Round 1Ch8 , return, sk 2 ch , work in BLO: 5hdc , 4hdc in the 1st ch (near the knot) and turn to the opposite side of the foundation ch-8. Work in the unused FLO: 4hdc , hdc inc . Slst to the top of the skipped ch-2.
- Round 2Ch1, sc inc in the same st, 5sc, (sc inc)×2, 7sc, sc inc. Slst to the first sc, fasten off.
Ears
Let’s make the right ear first. Join new yarn into the unused FLO on the top-right side of the dragon head.
Ch4 , return, sk 1 ch , work in BLO : slst, 1sc, hdc inc . Work 2slst in the join loop to turn to the opposite side of the ch-4. Work in the unused FLO : hdc inc, 1sc, slst . Slst to the first st to join. Fasten off and weave in the end.
Repeat for the left ear, but sk6 between them.
Assembly
- Step 1Attach the Muzzle : Secure the oval muzzle onto the base square, on the lower part of the head.
- Step 2Embroider Facial Features : Stitch a smile on the muzzle and two orange antlers onto the head.
- Step 3French Knots : Create four French knots in black yarn, two for the eyes and two for the nostrils .
- Step 4Eye Highlights : Add a small stitch of white yarn to each eye to make them lively.
Important notes
💡 The sample uses a 3.00 mm hook with wool yarn to hit 3.35 x 3.35 inches. If your squares come out larger, drop to a 2.75 mm hook rather than tightening your tension, because loose-but-consistent stitches block far better than white-knuckled ones
💡 Make your very first square as a gauge square before cutting yarn for a whole blanket. Measure it, then multiply by your planned grid. A 0.2 inch difference per square becomes almost 3 inches across a 12-square-wide blanket
💡 Put a stitch marker in the ch2 or ch3 that counts as your first stitch on every round. This pattern joins into the top of that starting chain repeatedly, and once you lose track of it in Round 5 or 6, the corner placement unravels fast
💡 Wind small bobbins or use short lengths for the six colors instead of pulling from six full skeins. Each color section here is only a round or two, and bobbins keep the back tidy and stop the strands from braiding themselves together
💡 Weave in every tail on the wrong side as you finish each color, not at the end. With six colors per square and a blanket's worth of squares, saving them up turns into hours of dull work later, and the BLO ridge makes tails harder to hide once neighbouring rounds are worked
💡 When you return to the starting corner on Round 6, you work 2dc + ch3 and then slip stitch to the top of the first TRUE dc, not into the beginning chain. Getting this right keeps the fourth corner the same size as the other three
💡 Finished size: with wool yarn and a 3.00 mm hook the completed granny square measures approximately 3.35 × 3.35 inches. Six colors are used across the head, background, muzzle, ears, the orange antlers and the black facial details
More photos
FAQ
Why do I turn the work to the wrong side before squaring off the head?
Turning over and working in BLO from the wrong side pushes the raised ridge to the front of the square, which is what outlines the dragon head so clearly. If you work it from the right side, the ridge lands on the back and the face looks flat. It feels counterintuitive the first time, but the difference is dramatic
Can I make this square bigger for a full-size blanket?
Yes, just repeat Round 5 as many times as you like. Each extra round adds one dc to every side plus the standard 2dc + ch3 + 2dc corner, growing the square by roughly half an inch per round with a 3.00 mm hook. Going up to a 4.00 mm hook and worsted yarn is the fastest way to size up
How much yarn does one square use?
Each 3.35 inch square uses only a small amount per color, so this is an excellent scrap-buster. A single 50g ball of DK will typically carry you through the background color of many squares, and the muzzle and ears need just a few yards each. Mini skein sets are perfect for the six-color spread
Do the ears and muzzle get stuffed?
No, this is a flat granny square rather than amigurumi, so all the pieces stay unstuffed and lie flat. The muzzle gets its dimension from being worked around both sides of the foundation chain, and the ears are shaped by their increases. Sew them on with a darning needle and matching yarn
What is the best way to join these squares into a blanket?
A simple sc join or whip stitch on the wrong side works beautifully because the corner ch-3 spaces line up neatly. Block all your squares to the same 3.35 inches first so the seams stay straight. If you want the dragons to float, join with a contrasting sc border round on each square before seaming
How are the ears attached to the head?
They are not sewn on separately. You join new yarn directly into the unused front loops on the top-right side of the dragon head and crochet the right ear straight onto the square, then repeat for the left ear skipping 6 stitches between them. That keeps them firmly anchored and perfectly spaced
Made your own square?
This site belongs to every crocheter. Share your design with the world — we’ll math-check the counts, polish it up, and publish it free for everyone, credited to you.
🧵 Share your pattern →
0 / 0 rounds