
Free Pattern
Step-by-Step
Crochet
Granny SquaresDog Single Crochet Granny Square – Free Crochet Pattern
Free dog granny square crochet pattern with sc-dec, sc3tog and hdc-inc shaping. Make a 4.7" x 5" puppy square for blankets and bags
Level IntermediateTime 2-3 HoursHook 3.00 mmYarn DK
About This Pattern
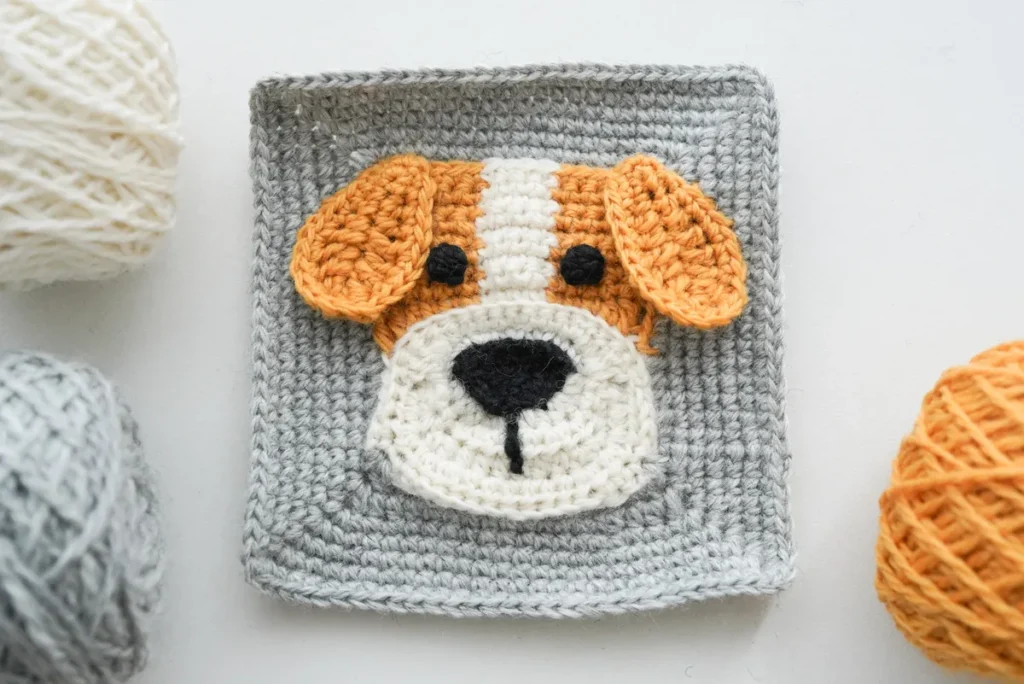
This pattern turns a humble single crochet square into a soft-eared puppy portrait, complete with a shaped muzzle, a little inverted-trapezoid nose and a rounded head worked over four colors. It starts from a simple chain-6 foundation and grows outward in short, purposeful rows rather than the usual round-and-round granny method, so the finished piece reads as a real dog face instead of a flat motif. It's perfect for anyone who wants their granny square blanket to have personality
You'll be working single crochet, single crochet decreases, sc3tog, slip stitches, half double crochet and hdc increases, plus a back-loop-only join that creates the crisp ridge separating the nose from the head. There are three separate parts to make, each just four or five rounds, then a small amount of seaming. Anyone who can decrease neatly and count stitches confidently will manage it. Set aside roughly two to three hours from first chain to woven-in ends
The finished square measures about 4.7 inches wide by 5.0 inches tall, which sits comfortably alongside standard granny squares in a blanket layout. In DK weight it comes out dense and slightly firm, with enough structure to hold the muzzle shape without stuffing. The face is unmistakably doggy from across the room, which makes it a wonderful gift front for a tote bag, a cushion panel, or a whole puppy-themed baby blanket for a dog-loving family
Variations
I have made an embarrassing number of plain granny squares in my life, so the first time I finished this dog's nose I actually laughed out loud. That little sc3tog and the sc-inc worked into the sixth skipped chain create a tiny inverted trapezoid that looks nothing special on the hook and then suddenly reads as a wet puppy nose the moment you turn it the right way up. That transformation is the best part of the whole make. I also love how honest the construction is. There is no stuffing, no wire, no fiddly embroidery to fake the shape. The muzzle is built by decreasing, the head curve comes from those five hdc increases in a row, and joining the new yarn into the back loops only gives you a crisp little ridge where the nose meets the face. It is real shaping doing real work. And because each part is only four or five rounds, you get that finished-something feeling three times in a single afternoon. It is the rare pattern that is genuinely fun to make and genuinely cute when it's done
Common mistakes
- Counting the chain-1 standing stitch as a real stitch at the start of the rows
- The pattern uses ch1 as a standing stitch, which means it stands in place of the first sc rather than adding an extra one. If you then work another sc into the same spot, your row grows by one stitch every single row and the muzzle stops tapering. Work your first sc into the stitch the ch1 sits on top of, and recount at the end of each row against the pattern's stitch total
- Working the sc3tog too loosely so the nose tip flares instead of pointing
- The sc3tog is what pulls the muzzle down to its narrow tip. If the three loops are pulled through with a loose yarn over, the tip stays wide and the nose reads as a blob. Keep the working yarn snug as you draw through all four loops, and give the stitch a gentle downward tug after completing it to settle the shape
- Missing the sc-inc that goes into the 6th skipped chain of the foundation
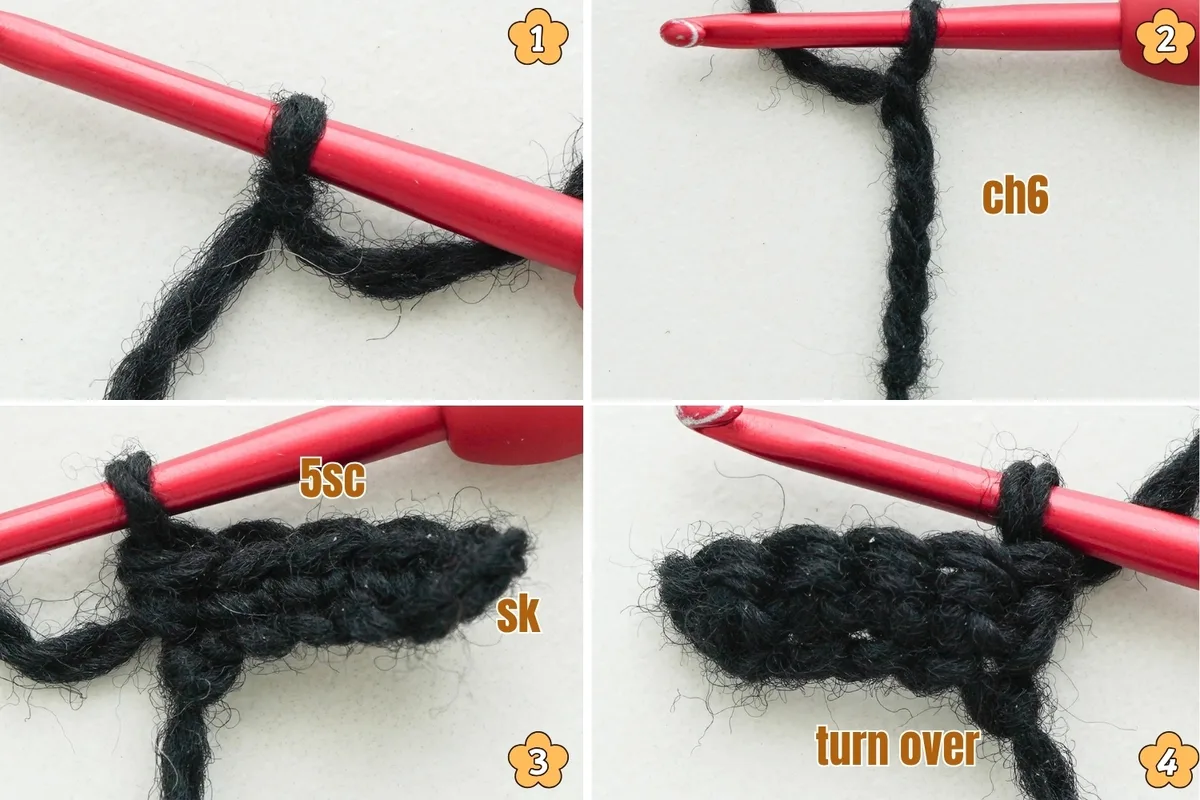
- That sixth chain is easy to lose because it sits at the very end of the foundation row and looks like part of the turning edge. Before you start the slip stitch travel, put a stitch marker in that chain so you can find it instantly. Skipping it leaves the nose lopsided and the following four slip stitches will not reach the sc3tog
- Joining the new yarn into both loops instead of back loops only after turning
- The pattern specifically says turn over and work BLO for the join. Working through both loops removes the ridge that visually separates the nose from the head, and the two colors blur into each other. Turn the piece first, then pick up only the back loop of that first sc of the sc-inc on the right before joining
- Bunching or fanning the run of five hdc-inc stitches on the head round
- Five increases in a row is a lot of extra fabric at once, and worked too tightly it cups while worked too loosely it ruffles. Keep your hdc height consistent by yarning over before inserting the hook every time, and lay the piece flat every couple of stitches. If it still ruffles, go down half a hook size for that section only
- Carrying all four colors loosely across the back of the work
- Long floats behind the square snag on fingers and show through the lighter colors, especially the cream muzzle. Cut and rejoin at each color change instead of carrying, leaving a six-inch tail. Weave those tails in along same-color stitches so they disappear rather than shadowing through the front


Intermediate
Materials
- Yarn of your choice- 4 colors, the sample is made with DK sports
- A crochet hook, we are using a 3.00mm hook
- Darning Needle
- Scissors
Main Pattern
- Round 1Turn over and BLO . Join new yarn into the first sc of the sc-inc on the right. ch1 as a standing st, 1sc in this st, 1sc, 4 sc-inc, 2sc, 5 hdc-inc, sl st to the first sc (22).(22)
- Round 2Turn over . ch1 as a standing st, 1sc in this st, 1sc, 1hdc, 1 hdc-inc, 2hdc, 1 hdc-inc, 1hdc, 2sc, sl st to the next st.
- Round 3Turn over . ch1 as a standing st, 1sc in this st, 1 sc-inc, 1 hdc-inc, 6hdc, 1 hdc-inc, 1 sc-inc, 1sc, sl st to the next st.
- Round 4Turn over . ch2 as a standing st(count as 1hdc), 1hdc, 3 hdc-inc, 6hdc, 3 hdc-inc, 2hdc, 1 dc-inc, (1dc+1hdc), (1hdc+1sc), 6sc, (1sc+1hdc), (1hdc+1dc), 1 dc-inc, sl st to the top of the first ch2.
- Round 5make 2 slst, 1sc, ch2, 2sc, make 10 slst, 2sc, ch2, 1sc, make 20 slst, join to the first slst, fasten off (6).All color changes use the same technique: make the final stitch incomplete, join your new yarn, yarn over and pull through to complete the stitch and finish the color change seamlessly.(6)
The Head
Part 2
- Round 1Rotate it 180 degrees and BLO for this row. Join new yarn in the slst which made into the 1st dc of the last dc-inc from Snout's Round4. ch4 as a standing st (count as 1 tr), 1dc, 1hdc, 3sc(make the 3rd sc an incomplete sc , yo with white yarn , then pull through to finish this sc and color changing)4sc (make the 4th sc an incomplete sc , yo with yellow yarn , then pull through to finish this sc and color changing), 3sc, 1hdc, 1dc, 1tr.
- Round 2Turn over. sk the tr, ch1 and make 1sc in next st, 4sc( do color change when make 4th sc ), 4sc( do color change when make 4th sc ), 4sc, sk the next dc, 1sc in the top of the ch4.
- Round 3Turn over. ch1+1sc in this st, 4sc( do color change when make 4th sc ), 4sc( do color change when make 4th sc ), 5sc.
- Round 4Turn over . sk the sc, ch1 and make 1sc in next st, 3sc( do color change when make 3rd sc ), 4sc( do color change when make 4th sc ), 3sc, sl st to the next ch1.Row 5-9 For each row: Work 1sc in each st back and forth , continuing with the same color as the previous round. Fasten off after Row 8.
The Square
Part 3
- Round 1TLO for this round except otherwise noted. Choosing the Snout Part, join to the right, add new yarn to the sc after ch2.(ch1+1sc) in this st, 4hdc, 1sc in BL of each ch of the next ch-4 group. Next 7 sts all work in the outer loops: 2sc, 4hdc, 1 sc-inc. 12sc. Next 11 sts all work in the outer loops: 1 sc-inc, 4hdc, 2sc, 4sc(work around the post of the tr from Head's Row 1). 4hdc, 1sc, (1sc+ch2+1dc) in next ch-2 sp, 3hdc, 8sc, 3hdc, (1dc+ch2+1sc)in next ch-2 sp, sl st to the first sc.
- Round 2ch1+1sc in this st, 13sc, 1 sc-inc, ch2, 1 sc-inc, 14sc, 1 sc-inc, ch2, 1 sc-inc, 15sc, (1sc+ch2+1hdc)in next ch-2 sp, 3hdc, 10sc, 3hdc, (1hdc+ch2+1sc)in next ch-2 sp, 1sc, sl st to the first sc (72).(72)
- Round 3-6For Each Round: ch1 to start, 1sc in each st, while (1sc+ch2+1sc) in each corner sp, sl st to the first sc.
- Round 7ch1 to start, 1sc in each st, while (3sc) in each corner sp, sl st to the first sc, fasten off.Leave long yarn tails at both ends for attaching. knot, ch10. sk2. Work 7 sts in BL of next 7 chs from back to beginning . 1hdc in the 8th ch, 3dc, 2hdc, 1sc, Work 7 sts in FL of next 7 chs from beginning to back . (3sc) in first ch. , 1sc, 2hdc, 3dc, 1 hdc-inc, sl st to the first hdc.Make a second ear in the same way. Using the long yarn tails, sew both ears to the two sides of the head part. Sew only the top and one-side edge of the ear. Leave the other edges free to move naturally.Leave long yarn tails at both ends for attaching. Start with a magic ring. ch1 as a standing st(count as an incomplete hdc), make the other 2 incomplete hdc in this ring, yo and pull through all loops on your hook to form a 3-hdc-puff, pull the tail tightly, ch1.Make another eye. Place one eye on each orange section, centered horizontally and positioned just above the middle of the head. With black yarn, create a vertical line extending down from the nose to signify the mouth.
Floppy Ears
Two Eyes
Important notes
💡 The sample uses a 3.00mm hook with DK sports yarn, which is deliberately smaller than the yarn band suggests. That tight gauge is what keeps the muzzle firm and stops the square from stretching out of its 4.7 x 5.0 inch shape. If your square comes out noticeably larger, drop to a 2.75mm rather than changing yarn
💡 Place a stitch marker in the 6th skipped chain of the foundation before you begin Step 5. You need to return to it much later for the sc-inc, and hunting for it in a tapered piece of fabric is genuinely frustrating
💡 This square is not stuffed. All the dimension in the nose comes from the sc3tog and the slip stitch travel, so resist the urge to pad it — stuffing will distort the flat back and make the square impossible to seam evenly into a blanket
💡 Because the piece is turned over several times, keep a small safety pin on the right side of the work from the very first row. Turning is easy to lose track of, and working a color round on the wrong side is the most common reason a finished dog looks mirrored
💡 Wind small bobbins or butterfly bundles of each of the four colors before you start rather than working from four full balls. The color sections are short, and untangling four DK balls halfway through the head round costs more time than the winding does
💡 Block the finished square gently with steam or a damp towel before assembling. The hdc increase section wants to curl slightly on the first day and settles into a clean edge once blocked, which matters a lot if you are joining many squares into a grid
More photos
FAQ
Can I make this dog granny square in worsted weight instead of DK?
Yes, worsted on a 4.0mm hook works well and gives you a square around 6 inches instead of 4.7 x 5.0 inches. Just be aware that the sc3tog nose tip becomes chunkier at that scale, so keep your decreases extra snug to preserve the shape
Why does my nose look flat instead of like an inverted trapezoid?
Nine times out of ten it's the sc3tog being worked too loosely, or the sc-inc into the 6th skipped chain being missed entirely. Lay the finished nose piece down and check that it has a wide top edge narrowing to a point — if both sides aren't symmetrical, one of the sc-inc stitches is in the wrong place
Do the three pattern parts get sewn together or crocheted together?
They're joined with a darning needle after all three are complete, which gives you the flexibility to position the ears and muzzle exactly where they look right on your particular square. Use a length of the head color and small whip stitches along the back so the seam disappears from the front
How many of these squares do I need for a baby blanket?
roughly 4.7 x 5.0 inches each, a 6 by 7 grid gives you about 28 x 35 inches, which is a good stroller blanket size. Most people alternate dog squares with plain solid squares so the faces have breathing room and the blanket doesn't take forever
What does BLO mean in this pattern and why does it matter here?
BLO means back loops only — you insert your hook under just the back loop of the stitch instead of both loops. In this pattern it creates the visible ridge where the nose meets the head, which is what makes the muzzle look like it sits forward instead of being painted flat onto the square
Made your own square?
This site belongs to every crocheter. Share your design with the world — we’ll math-check the counts, polish it up, and publish it free for everyone, credited to you.
🧵 Share your pattern →
0 / 0 rounds