
Free Pattern
Step-by-Step
Crochet
Granny SquaresDuckling Granny Square — A Sweet Beginner Appliqué Pattern
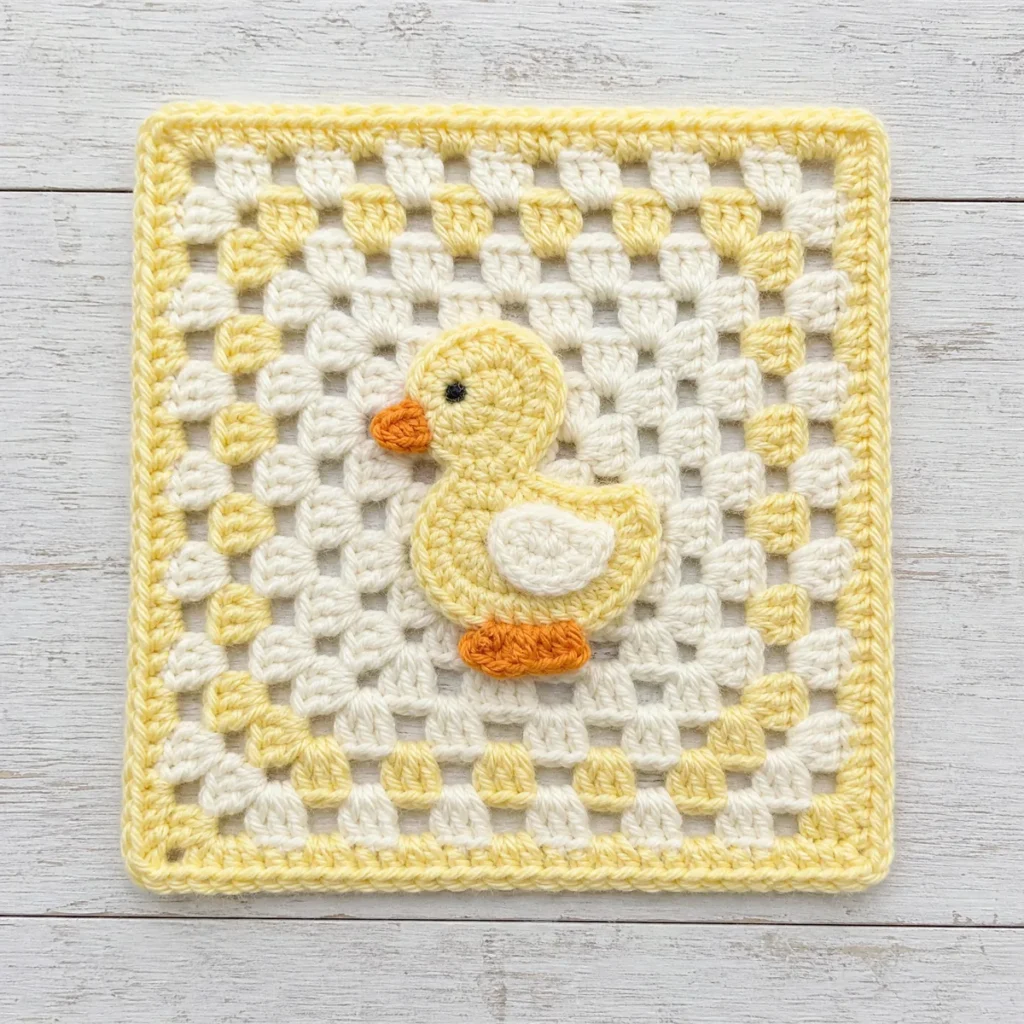
A cheerful 5-round granny square in cream, buttery yellow, and orange, finished with a sweet duckling applique — simple enough for confident beginners.
Level BeginnerTime 1-1.5 HoursHook 5.0 mmYarn Worsted
About This Pattern
The Duckling Granny Square starts out as a classic granny square worked in soft cream and buttery yellow, but it doesn't stay a plain background for long. A round little duckling, complete with a tucked wing and a cheerful orange beak, gets stitched separately and sewn on top, turning a familiar square into a small scene. It's a pictorial square in the truest sense: the background sets the stage, and the appliqué gives it a face.
Underneath the appliqué, the construction is pure classic granny square: a magic ring start, corner ch-2 spaces, and rounds of 3-dc groups building outward before a tidy single crochet border pulls everything together. Because the shaping and color changes follow the rhythm you already know from other granny squares, this pattern suits confident beginners who've made a square or two and are ready to add a little hand-sewn detail to their skill set.
Blocked out, the finished square measures about 7 by 7 inches, a tidy size that works on its own as a mug rug or gathered with others into a bright blanket, pillow front, or set of coasters. Because the palette stays soft and simple, cream, buttery yellow, and orange, it slots in easily wherever you want a cheerful, nature-inspired motif.
Variations
There's something irresistibly cheerful about a duckling, and I loved figuring out how to bring that charm into a granny square. I wanted a background that felt classic and calm, cream and buttery yellow, worked in the same relaxed rounds you already know, so the little appliqué could be the star. Stitching the tucked wing and that bright orange beak separately, then setting them in place, felt like tiny sculpture more than crochet. It's the kind of project where you finish one round, look down, and grin because it's already recognizably a duckling. I think that's what keeps me coming back to pictorial squares: the moment a handful of stitches suddenly becomes a little character with personality of its own.
Common mistakes
- Losing the corner spaces
- If your square starts curling instead of lying flat, you've likely missed working into the ch-2 corner space. Always work your (3 dc, ch 2, 3 dc) directly into that corner loop, not into the stitches around it.
- Skipping a stitch count check
- Pause after each round and compare your stitch count to the pattern before starting the next one. Catching a miscount early saves you from unraveling a nearly finished square.
- Placing the duckling off-center
- Pin the body, wing, and beak pieces in place before you sew a single stitch, and step back to check the balance. A quick adjustment now beats picking out stitches later.
- Sewing the appliqué too loosely
- Loose stitches let the duckling's edges curl away from the background over time. Use small, snug whip stitches and weave in every tail so the pieces stay flat and secure.


Beginner
Materials
- Worsted-weight yarn in 3 colors (cream, buttery yellow, orange) — about 25–40 g total per square
- 5.0 mm crochet hook
- Yarn needle for weaving in ends
- Scissors
The Background Square
Work the plain background square first — the duckling pieces are sewn on at the end. Every count below is math-verified.
- Round 1With cream, in a magic ring: ch 3, 2 dc, ch 2, [3 dc, ch 2] 3 times; sl st to top of ch-3 to join (12)Step by step Step by step: Using cream yarn, in a magic ring: make 3 chain stitches, 2 double crochet, make 2 chain stitches, [3 double crochet, make 2 chain stitches] 3 times; slip stitch to top of ch-3 to join.
- Round 2sl st to corner sp, ch 3, 2 dc, ch 2, 3 dc in same corner, ch 1, [(3 dc, ch 2, 3 dc) in corner sp, ch 1, ] 3 times; sl st to join (24)Step by step Step by step: Slip stitch to corner space, make 3 chain stitches, 2 double crochet, make 2 chain stitches, 3 double crochet in same corner, make 1 chain stitch, [(3 double crochet, make 2 chain stitches, 3 double crochet) in corner space, make 1 chain stitch, ] 3 times; slip stitch to join.
- Round 3With buttery yellow, sl st to corner sp, ch 3, 2 dc, ch 2, 3 dc in same corner, ch 1, 3 dc, ch 1, [(3 dc, ch 2, 3 dc) in corner sp, ch 1, 3 dc, ch 1, ] 3 times; sl st to join (36)Step by step Step by step: Using buttery yellow yarn, slip stitch to corner space, make 3 chain stitches, 2 double crochet, make 2 chain stitches, 3 double crochet in same corner, make 1 chain stitch, 3 double crochet, make 1 chain stitch, [(3 double crochet, make 2 chain stitches, 3 double crochet) in corner space, make 1 chain stitch, 3 double crochet, make 1 chain stitch, ] 3 times; slip stitch to join.
- Round 4sl st to corner sp, ch 3, 2 dc, ch 2, 3 dc in same corner, ch 1, 3 dc, ch 1, 3 dc, ch 1, [(3 dc, ch 2, 3 dc) in corner sp, ch 1, 3 dc, ch 1, 3 dc, ch 1, ] 3 times; sl st to join (48)
Step by step Step by step: Slip stitch to corner space, make 3 chain stitches, 2 double crochet, make 2 chain stitches, 3 double crochet in same corner, make 1 chain stitch, 3 double crochet, make 1 chain stitch, 3 double crochet, make 1 chain stitch, [(3 double crochet, make 2 chain stitches, 3 double crochet) in corner space, make 1 chain stitch, 3 double crochet, make 1 chain stitch, 3 double crochet, make 1 chain stitch, ] 3 times; slip stitch to join.
- Round 5With cream, sl st to corner sp, ch 3, 2 dc, ch 2, 3 dc in same corner, ch 1, 3 dc, ch 1, 3 dc, ch 1, 3 dc, ch 1, [(3 dc, ch 2, 3 dc) in corner sp, ch 1, 3 dc, ch 1, 3 dc, ch 1, 3 dc, ch 1, ] 3 times; sl st to join (60)
Step by step Step by step: Using cream yarn, slip stitch to corner space, make 3 chain stitches, 2 double crochet, make 2 chain stitches, 3 double crochet in same corner, make 1 chain stitch, 3 double crochet, make 1 chain stitch, 3 double crochet, make 1 chain stitch, 3 double crochet, make 1 chain stitch, [(3 double crochet, make 2 chain stitches, 3 double crochet) in corner space, make 1 chain stitch, 3 double crochet, make 1 chain stitch, 3 double crochet, make 1 chain stitch, 3 double crochet, make 1 chain stitch, ] 3 times; slip stitch to join.
- Bordersl st into the corner ch-2 sp, ch 1, [3 sc in the corner sp, (sc in next 3 sts, sc in next sp) 4 times, sc in next 3 sts] 4 times; sl st to the first sc (88)Step by step Step by step: Slip stitch into the corner ch-2 space, make 1 chain stitch, [3 single crochet in the corner space, (single crochet in next 3 stitches, single crochet in next space) 4 times, single crochet in next 3 stitches] 4 times; slip stitch to the first single crochet.
The Body
Worked in buttery yellow. Leave a long tail for sewing.
- Round 16 sc in a magic ring (6)
- Round 2[inc] repeat 6 times (12)
- Round 3[sc, inc] repeat 6 times (18)
- Round 4[sc in next 2 sts, inc] repeat 6 times (24)
The Wing
Worked in cream. Leave a long tail for sewing.
- Round 16 sc in a magic ring (6)
- Round 2[inc] repeat 6 times (12)
The Beak
Worked in orange. Leave a long tail for sewing.
- Round 1ch 4, sc in 2nd ch from hook, sc in next ch, sc in next ch (3)
- Round 2ch 1, turn, dec, sc in next st (2)
- Round 3ch 1, turn, dec (1)
Assembly — Bringing It Together
Step 1 Weave in the magic-ring tail on the Body, then pin the Body just above center on the background square.
Step 2 Sew the Body down around its outer edge with matching yellow thread, adding a light pinch of stuffing before closing the last few stitches for a slightly puffed look.
Step 3 Pin the Beak so its point (Row 3) faces outward from the lower-right edge of the Body, with the straight top edge (Row 1) tucked just under the Body; sew along the two slanted edges only.
Step 4 Pin the Wing onto the lower half of the Body, overlapping the edge slightly; sew around the outer edge only so it sits like a raised wing.
Step 5 Embroider the eyes above the beak once all pieces are secured.
Embroidery Add two small straight stitches (or French knots) in black yarn side by side above the beak for the eyes.
Embroidery Optional: two tiny orange straight-stitch 'V' feet peeking out beneath the body.
Important notes
💡 Gauge: the finished square is about 7 x 7 inches in Worsted weight yarn with a 5.0 mm hook. Tight crocheters can go up half a hook size; loose ones down half.
💡 Color plan: the sample uses cream, buttery yellow, orange in round order — change colors with a slip-stitch join in the first stitch of the new round.
💡 Weave in your color-change tails as you go rather than saving them all for the end — it keeps the back of your square tidy and makes assembly easier later.
💡 Block your finished square lightly with a spray of water and a gentle press under a towel; it squares up the corners and helps the duckling appliqué lie perfectly flat.
FAQ
What yarn and hook size do I need for the Duckling Granny Square?
This square is worked in worsted weight (medium, #4) yarn with a 5.0 mm hook. Any worsted weight yarn in cream, buttery yellow, and orange will work beautifully.
How big is the finished square?
Once the five rounds and border are complete, the square measures about 7 by 7 inches. Gauge and yarn choice can shift that slightly, so swatch first if exact size matters for your project.
Is this pattern good for a beginner?
Yes, it's rated beginner friendly. The background square uses standard granny square rounds, and the duckling appliqué pieces are small and forgiving to stitch and sew on.
How do I attach the duckling appliqué to the square?
Stitch the body, wing, and beak pieces separately, then pin them onto the finished background square before whip-stitching them in place with a tapestry needle and matching yarn.
Made your own square?
This site belongs to every crocheter. Share your design with the world — we’ll math-check the counts, polish it up, and publish it free for everyone, credited to you.
🧵 Share your pattern →
0 / 0 rounds