
Free Pattern
Step-by-Step
Crochet
Granny SquaresLavender Sprig Granny Square — A Beginner Applique Pattern
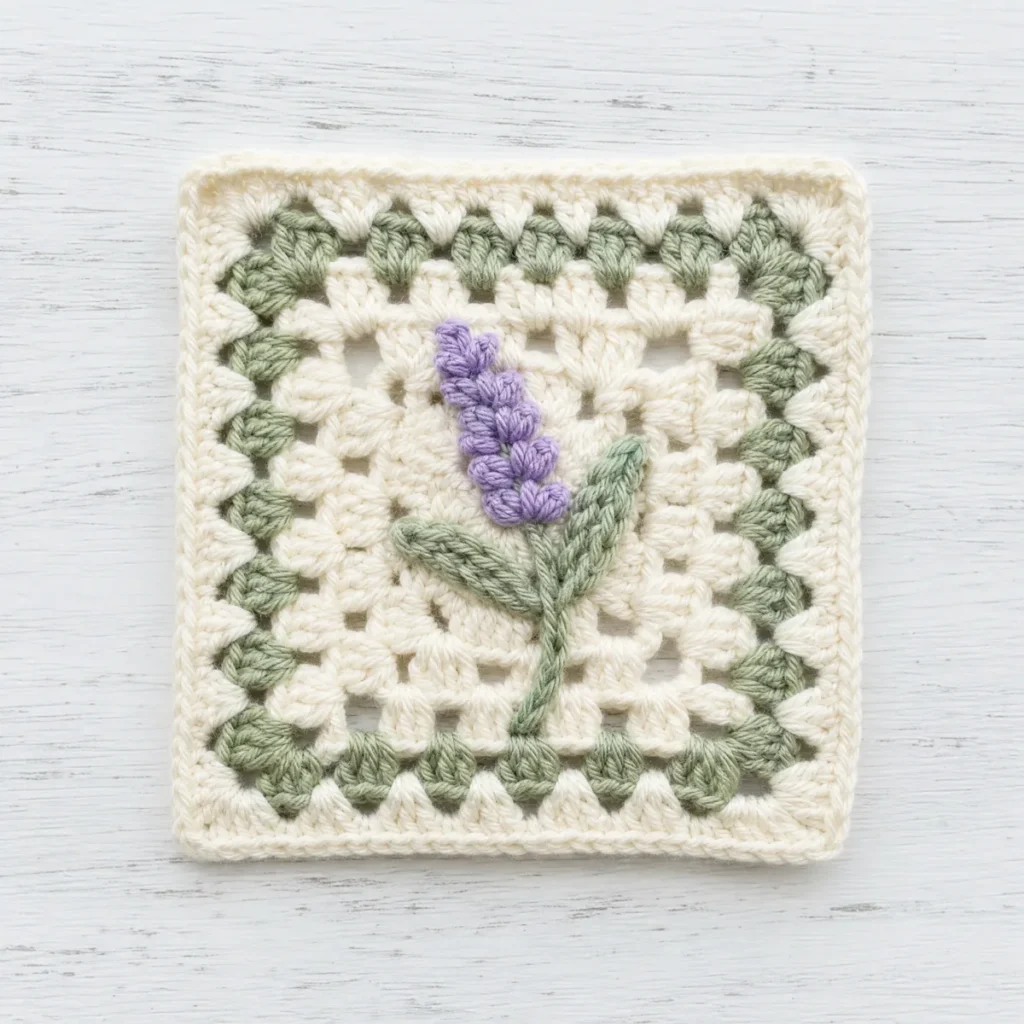
A beginner-friendly granny square with a stitched lavender sprig charm sewn on top. Five rounds in cream, sage, and lavender make this cozy 6-inch block.
Level BeginnerTime 45-60 MinutesHook 5.0 mmYarn Worsted
About This Pattern
The Lavender Sprig Granny Square starts as a classic four-round granny in cream and sage, then gets its personality from a small crocheted sprig sewn onto the background: a stem, a leaf, a little bud cluster, and one small bud standing off on its own.
The background rounds use only chains and double crochet, so anyone comfortable with a basic granny square can manage them, and the applique pieces are small enough to be a gentle, low-pressure way to try sewing motifs onto a background for the first time.
Finished, it sits at about 6 by 6 inches with a soft, garden-sprig feel that suits a cottage-style blanket, a set of coasters or a small pillow, and it mixes easily into a bed of other classic granny squares in the same three colors.
Variations
This square is easy to make your own. Swap the lavender for a soft pink or deep plum if you want the sprig to read differently, or try the background in dove gray or a warm oatmeal instead of cream for a moodier base. A worsted-weight cotton blend gives the sprig pieces a bit more structure so they hold their shape when sewn on, while an all-acrylic version stays soft and washable for everyday use. If you want a bigger finished square, add a fifth background round in a fourth color before working the border, or make a whole basketful in mixed sprig colors so no two blocks match exactly. Either way, keep the background simple so the applique still gets to be the star.
I designed this square to be humble on purpose. It would have been easy to crowd the background with extra flowers or a busier border, but I wanted the little lavender sprig to be the whole point, the way a single stem looks in a jar on a windowsill. The background rounds go together fast in cream, sage, and lavender, and then the fun part starts: stitching on the stem, the leaf, the bud cluster, and that one small bud that always makes people smile when they spot it. It is a forgiving first applique project, since every piece is small and sewn rather than stitched into the round. I love how much personality one tiny sprig can carry.
Common mistakes
- Crowding the background with extra motifs
- Resist adding more embellishments beyond the sprig; the design is meant to stay quiet so the applique stands out. Keep the background rounds clean and let the sprig do the talking.
- Sewing the applique before blocking
- Sew the sprig pieces on after your background square is shaped and settled, since stitching them on too early can pull the fabric out of square. A quick block first keeps everything lying flat.
- Losing track of the corner spaces
- Each round's ch-2 corner space is what the next round's corner group works into, so miscounting one round throws off every round after it. Count your corner groups before moving on.
- Using a bulky yarn for tiny buds
- A heavier yarn makes the small bud and leaf pieces harder to shape crisply. Stick with worsted weight so the tiny applique pieces stay neat and easy to sew on.


Beginner
Materials
- Worsted-weight yarn in 3 colors (cream, sage, lavender) — about 25–40 g total per square
- 5.0 mm crochet hook
- Yarn needle for weaving in ends
- Scissors
The Background Square
Work the plain background square first — the lavender sprig pieces are sewn on at the end. Every count below is math-verified.
- Round 1With cream, in a magic ring: ch 3, 2 dc, ch 2, [3 dc, ch 2] 3 times; sl st to top of ch-3 to join (12)Step by step Step by step: Using cream yarn, in a magic ring: make 3 chain stitches, 2 double crochet, make 2 chain stitches, [3 double crochet, make 2 chain stitches] 3 times; slip stitch to top of ch-3 to join.
- Round 2sl st to corner sp, ch 3, 2 dc, ch 2, 3 dc in same corner, ch 1, [(3 dc, ch 2, 3 dc) in corner sp, ch 1, ] 3 times; sl st to join (24)Step by step Step by step: Slip stitch to corner space, make 3 chain stitches, 2 double crochet, make 2 chain stitches, 3 double crochet in same corner, make 1 chain stitch, [(3 double crochet, make 2 chain stitches, 3 double crochet) in corner space, make 1 chain stitch, ] 3 times; slip stitch to join.
- Round 3With sage, sl st to corner sp, ch 3, 2 dc, ch 2, 3 dc in same corner, ch 1, 3 dc, ch 1, [(3 dc, ch 2, 3 dc) in corner sp, ch 1, 3 dc, ch 1, ] 3 times; sl st to join (36)Step by step Step by step: Using sage yarn, slip stitch to corner space, make 3 chain stitches, 2 double crochet, make 2 chain stitches, 3 double crochet in same corner, make 1 chain stitch, 3 double crochet, make 1 chain stitch, [(3 double crochet, make 2 chain stitches, 3 double crochet) in corner space, make 1 chain stitch, 3 double crochet, make 1 chain stitch, ] 3 times; slip stitch to join.
- Round 4sl st to corner sp, ch 3, 2 dc, ch 2, 3 dc in same corner, ch 1, 3 dc, ch 1, 3 dc, ch 1, [(3 dc, ch 2, 3 dc) in corner sp, ch 1, 3 dc, ch 1, 3 dc, ch 1, ] 3 times; sl st to join (48)
Step by step Step by step: Slip stitch to corner space, make 3 chain stitches, 2 double crochet, make 2 chain stitches, 3 double crochet in same corner, make 1 chain stitch, 3 double crochet, make 1 chain stitch, 3 double crochet, make 1 chain stitch, [(3 double crochet, make 2 chain stitches, 3 double crochet) in corner space, make 1 chain stitch, 3 double crochet, make 1 chain stitch, 3 double crochet, make 1 chain stitch, ] 3 times; slip stitch to join.
- BorderWith cream, sl st into the corner ch-2 sp, ch 1, [3 sc in the corner sp, (sc in next 3 sts, sc in next sp) 3 times, sc in next 3 sts] 4 times; sl st to the first sc (72)Step by step Step by step: Using cream yarn, slip stitch into the corner ch-2 space, make 1 chain stitch, [3 single crochet in the corner space, (single crochet in next 3 stitches, single crochet in next space) 3 times, single crochet in next 3 stitches] 4 times; slip stitch to the first single crochet.
The Stem
Worked in sage. Leave a long tail for sewing.
- Round 1ch 7, sc in 2nd ch from hook, sc in next 4 sts, 3 sc in last ch, working back along the underside sc in next 4 sts, 2 sc in last (14)
The Leaf
Worked in sage. Leave a long tail for sewing.
- Round 1ch 8, sc in 2nd ch from hook, sc in next 5 sts, 3 sc in last ch, working back along the underside sc in next 5 sts, 2 sc in last (16)
The Bud Cluster
Worked in lavender. Leave a long tail for sewing.
- Round 16 sc in a magic ring (6)
- Round 2[inc] repeat 6 times (12)
The Small Bud
Worked in lavender. Leave a long tail for sewing.
- Round 16 sc in a magic ring (6)
Assembly — Bringing It Together
Step 1 Pin the Stem diagonally across the background square, running from just below center out toward one corner, curving very slightly
Step 2 Pin the Leaf along the lower half of the stem, angled outward like it's growing from the stem's side
Step 3 Pin the Bud Cluster at the top tip of the stem, slightly overlapping the stem's end
Step 4 Pin the Small Bud (if made) just below the Bud Cluster, tucked close to the stem to look like an emerging second bud
Step 5 Sew all pieces down with a whip stitch in matching thread, working around each edge, then weave in all ends on the back before adding embroidery
Embroidery With cream thread, work 3-4 short straight stitches scattered across the Bud Cluster to suggest tiny individual blossoms within the head
Embroidery Add a single small cream straight stitch on top of each Small Bud for a dusty highlight
Embroidery With sage thread, work one straight stitch down the center of the Leaf as a simple vein
Important notes
💡 Gauge: the finished square is about 6 x 6 inches in Worsted weight yarn with a 5.0 mm hook. Tight crocheters can go up half a hook size; loose ones down half.
💡 Color plan: the sample uses cream, sage, lavender in round order — change colors with a slip-stitch join in the first stitch of the new round.
💡 Baste the sprig pieces in place with a few loose stitches before sewing them down for good, so you can adjust the angle of the stem before it is permanent.
💡 Weave in the applique tails on the back of the square rather than trimming them short, so nothing works loose after the pieces are washed.
FAQ
Do I need special skills to add the applique pieces?
No, just basic sewing with a yarn needle. You crochet the stem, leaf, bud cluster, and small bud separately, then stitch them onto the finished background square with simple straight stitches.
Can I make this square without the applique if I am short on time?
Yes, the background square is a complete classic granny on its own. The applique is what turns it into the Lavender Sprig design, but the four rounds and border work fine without it.
What size hook and yarn does this pattern use?
A 5.0 mm hook with worsted-weight yarn, which gives a finished square of about 6 by 6 inches, easy to match with other worsted granny squares.
How many granny squares would I need for a blanket?
It depends on the size you want, but a lap-size blanket usually takes somewhere around 30 to 48 squares of this size, sewn together in cream, sage, and lavender for a cohesive look.
Why is the sprig so small compared to other applique motifs?
I kept it deliberately humble. A single stem with modest leaves and buds leaves room to breathe, so the tiny details of the sprig get to be the focus instead of getting lost in a crowded design.
Made your own square?
This site belongs to every crocheter. Share your design with the world — we’ll math-check the counts, polish it up, and publish it free for everyone, credited to you.
🧵 Share your pattern →
0 / 0 rounds