
Free Pattern
Step-by-Step
Crochet
Granny SquaresLittle Tulip Granny Square — A Blooming Beginner Favorite
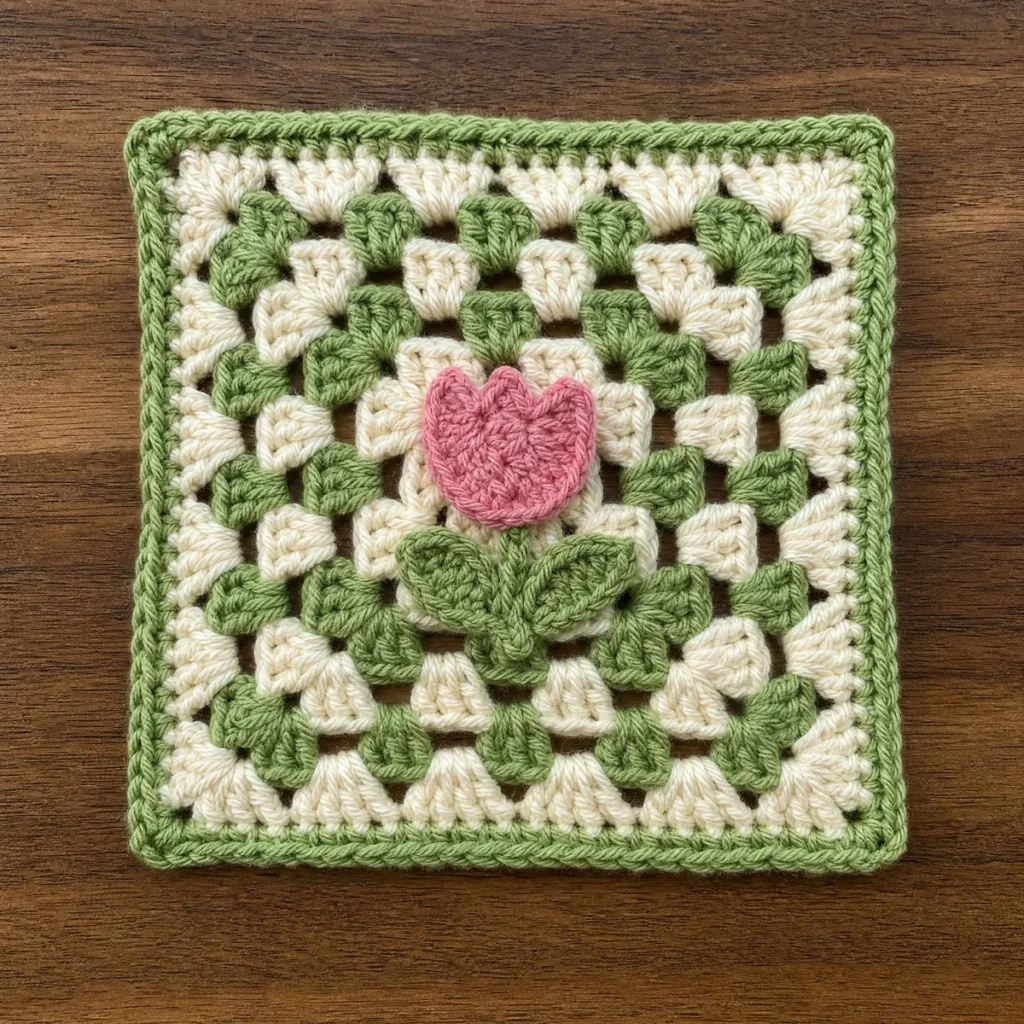
A single tulip appliqué nods atop its stem on a cream granny square worked in six beginner-friendly rounds, then blooms in leaf green and tulip pink.
Level BeginnerTime 1-1.5 HoursHook 5.0 mmYarn Worsted
About This Pattern
The Little Tulip Granny Square is a classic granny square with a twist: instead of stopping at the usual stacked corners, I stitch a tiny tulip — its head, stem, and two leaves — as separate little pieces, then sew them onto the finished background so a single flower seems to nod right there on the surface. It's part of the classic family, so the bones of the square will feel instantly familiar, but that one small appliqué gives it a storybook charm you don't often get from a straightforward granny.
You'll build the background in six rounds worked from a magic ring, moving through cream, leaf green, and tulip pink, then finish with a tidy single crochet border. The corners and spaces follow the same rhythm the whole way, so once you've got the first round or two under your fingers, the rest is pure easy rhythm. The only new skill is the appliqué step itself — a bit of simple sewing to fix the tulip pieces in place, nothing more complicated than that. It's a lovely pick for a beginner who has the basic granny square down and is ready for a little extra charm, or for anyone who wants a mindless, happy make for an evening on the couch.
Finished, the square sits at about 7 by 7 inches, with that sweet little tulip perched near the center like it grew there. I love working up a handful of these for a baby blanket or a set of throw pillows, and they're just as pretty framed as a single square for a small hanging or a bag front. Mix them with other pieces from the classic family and you've got a garden's worth of texture and color in one blanket.
Variations
This little tulip is easy to replant in any garden you like. Swap the tulip pink for sunny yellow or deep coral, or try two different pinks across a set of squares so each bloom looks a bit different, the way real tulips do. If you want a wilder look, work the background rounds in a soft gray or charcoal so the flower pops even more against it. Sizing up is simple too: add an extra round or two in cream before the border and the square grows to fit a pillow front, or work several with different flower colors and join them into a cheerful little blanket. A smooth cotton yarn instead of worsted acrylic gives the petals a bit more structure and definition.
I fell for this square the moment I sewed the little leaves into place and stepped back — suddenly that plain cream background had a whole story on it. There's something so satisfying about working a tidy classic granny in one breath, then watching a tiny tulip come to life in your hands from just a few small pieces. It's forgiving too: the background rounds use the same corner-and-space rhythm you already know, so your hands can relax while your eyes do the fun part later. I love handing this one to newer crocheters because it proves a beginner square can still feel like a little piece of art once that appliqué goes on.
Common mistakes
- Losing track of corners
- It's easy to lose your place in the ch-2 corner spaces as the square grows. Slip a stitch marker into each corner space as you finish a round so the next round's corners are easy to spot.
- Sewing the appliqué on too tight
- Pulling your sewing yarn taut while attaching the tulip pieces can pucker the background square. Keep your tension relaxed and check that the square still lies flat as you go.
- Skipping a pin-first placement
- Sewing the tulip head, stem, and leaves on freehand often leaves the flower off-center. Pin all the pieces in place first and step back to check the balance before you stitch anything down.
- Leaving yarn ends untrimmed
- Bulky, untrimmed ends underneath the appliqué pieces will show through as lumps once everything is sewn down. Weave in and trim the ends on both the background and the tulip pieces before assembling.


Beginner
Materials
- Worsted-weight yarn in 3 colors (cream, leaf green, tulip pink) — about 25–40 g total per square
- 5.0 mm crochet hook
- Yarn needle for weaving in ends
- Scissors
The Background Square
Work the plain background square first — the little tulip pieces are sewn on at the end. Every count below is math-verified.
- Round 1With cream, in a magic ring: ch 3, 2 dc, ch 2, [3 dc, ch 2] 3 times; sl st to top of ch-3 to join (12)Step by step Step by step: Using cream yarn, in a magic ring: make 3 chain stitches, 2 double crochet, make 2 chain stitches, [3 double crochet, make 2 chain stitches] 3 times; slip stitch to top of ch-3 to join.
- Round 2sl st to corner sp, ch 3, 2 dc, ch 2, 3 dc in same corner, ch 1, [(3 dc, ch 2, 3 dc) in corner sp, ch 1, ] 3 times; sl st to join (24)Step by step Step by step: Slip stitch to corner space, make 3 chain stitches, 2 double crochet, make 2 chain stitches, 3 double crochet in same corner, make 1 chain stitch, [(3 double crochet, make 2 chain stitches, 3 double crochet) in corner space, make 1 chain stitch, ] 3 times; slip stitch to join.
- Round 3With leaf green, sl st to corner sp, ch 3, 2 dc, ch 2, 3 dc in same corner, ch 1, 3 dc, ch 1, [(3 dc, ch 2, 3 dc) in corner sp, ch 1, 3 dc, ch 1, ] 3 times; sl st to join (36)Step by step Step by step: Using leaf green yarn, slip stitch to corner space, make 3 chain stitches, 2 double crochet, make 2 chain stitches, 3 double crochet in same corner, make 1 chain stitch, 3 double crochet, make 1 chain stitch, [(3 double crochet, make 2 chain stitches, 3 double crochet) in corner space, make 1 chain stitch, 3 double crochet, make 1 chain stitch, ] 3 times; slip stitch to join.
- Round 4sl st to corner sp, ch 3, 2 dc, ch 2, 3 dc in same corner, ch 1, 3 dc, ch 1, 3 dc, ch 1, [(3 dc, ch 2, 3 dc) in corner sp, ch 1, 3 dc, ch 1, 3 dc, ch 1, ] 3 times; sl st to join (48)
Step by step Step by step: Slip stitch to corner space, make 3 chain stitches, 2 double crochet, make 2 chain stitches, 3 double crochet in same corner, make 1 chain stitch, 3 double crochet, make 1 chain stitch, 3 double crochet, make 1 chain stitch, [(3 double crochet, make 2 chain stitches, 3 double crochet) in corner space, make 1 chain stitch, 3 double crochet, make 1 chain stitch, 3 double crochet, make 1 chain stitch, ] 3 times; slip stitch to join.
- Round 5With cream, sl st to corner sp, ch 3, 2 dc, ch 2, 3 dc in same corner, ch 1, 3 dc, ch 1, 3 dc, ch 1, 3 dc, ch 1, [(3 dc, ch 2, 3 dc) in corner sp, ch 1, 3 dc, ch 1, 3 dc, ch 1, 3 dc, ch 1, ] 3 times; sl st to join (60)
Step by step Step by step: Using cream yarn, slip stitch to corner space, make 3 chain stitches, 2 double crochet, make 2 chain stitches, 3 double crochet in same corner, make 1 chain stitch, 3 double crochet, make 1 chain stitch, 3 double crochet, make 1 chain stitch, 3 double crochet, make 1 chain stitch, [(3 double crochet, make 2 chain stitches, 3 double crochet) in corner space, make 1 chain stitch, 3 double crochet, make 1 chain stitch, 3 double crochet, make 1 chain stitch, 3 double crochet, make 1 chain stitch, ] 3 times; slip stitch to join.
- Bordersl st into the corner ch-2 sp, ch 1, [3 sc in the corner sp, (sc in next 3 sts, sc in next sp) 4 times, sc in next 3 sts] 4 times; sl st to the first sc (88)Step by step Step by step: Slip stitch into the corner ch-2 space, make 1 chain stitch, [3 single crochet in the corner space, (single crochet in next 3 stitches, single crochet in next space) 4 times, single crochet in next 3 stitches] 4 times; slip stitch to the first single crochet.
The Tulip Head
Worked in tulip pink. Leave a long tail for sewing.
- Round 1ch 4, sc in next 3 sts (3)
- Round 2ch 1, turn, inc in first st, sc in next st, inc in last st (5)
- Round 3ch 1, turn, inc in first st, sc in next 3 sts, inc in last st (7)
The Stem
Worked in leaf green. Leave a long tail for sewing.
- Round 1ch 7, sc in next 6 sts (6)
The Leaf Left
Worked in leaf green. Leave a long tail for sewing.
- Round 1ch 5, sc in next 3 sts, 3 sc in last st, sc in next 3 sts (9)
The Leaf Right
Worked in leaf green. Leave a long tail for sewing.
- Round 1ch 5, sc in next 3 sts, 3 sc in last st, sc in next 3 sts (9)
Assembly — Bringing It Together
Step 1 Pin the Stem vertically in the lower-center of the background square, running from about 1 inch above the bottom edge up to the center of the square, and sew along both long edges.
Step 2 Pin a Leaf on each side of the stem near its base, angled outward like a shallow V, and whipstitch around each leaf's curved edge, leaving the pointed base open where it meets the stem.
Step 3 Pin the Tulip Head at the top of the stem so its narrow 3-stitch edge overlaps the stem's top end and its wide 7-stitch edge curves upward like a cup; sew around the sides and top edge, tacking the narrow base snugly to the stem tip.
Step 4 Weave in all tails on the back of the square before working the border.
Embroidery With cream thread, work one straight stitch from the base to the top edge of the Tulip Head to suggest a petal seam.
Embroidery Add two or three short cream straight stitches fanning from the base of the Tulip Head for light petal veins.
Important notes
💡 Gauge: the finished square is about 7 x 7 inches in Worsted weight yarn with a 5.0 mm hook. Tight crocheters can go up half a hook size; loose ones down half.
💡 Color plan: the sample uses cream, leaf green, tulip pink in round order — change colors with a slip-stitch join in the first stitch of the new round.
💡 Block your background square lightly before sewing the tulip pieces on — a flat, even base makes the appliqué placement much easier to judge.
💡 Keep a small stitch marker or scrap of yarn on the first corner of every round; it saves you from counting all the way around just to find your place again.
FAQ
Is the Little Tulip Granny Square really beginner-friendly?
Yes — the background uses the same corner-and-space granny square rhythm beginners already know, and the tulip appliqué is just simple hand sewing once the pieces are made. If you can chain, double crochet, and thread a yarn needle, you're set.
What yarn and hook does this pattern use?
It's worked in worsted weight yarn with a 5.0 mm hook, in cream, leaf green, and tulip pink. Any worsted weight yarn you love working with will do the job.
How do I attach the tulip pieces to the square?
Once the tulip head, stem, and leaves are stitched, you simply pin them onto the finished background in the arrangement you like, then sew each piece down with a yarn needle and matching yarn. Keep your stitches small and your tension relaxed so the square stays flat.
How big is the finished square?
Each Little Tulip Granny Square finishes at about 7 by 7 inches, which makes it easy to combine with other classic family squares in a blanket or pillow.
Can I use a different color for the tulip?
Absolutely — the tulip pink is just my favorite for this design, but any accent color will make the flower pop against the cream background. Try a color that matches the rest of your project.
Made your own square?
This site belongs to every crocheter. Share your design with the world — we’ll math-check the counts, polish it up, and publish it free for everyone, credited to you.
🧵 Share your pattern →
0 / 0 rounds