
Free Pattern
Step-by-Step
Crochet
Granny SquaresPaige the Panda Granny Square — A Playful Beginner Pattern
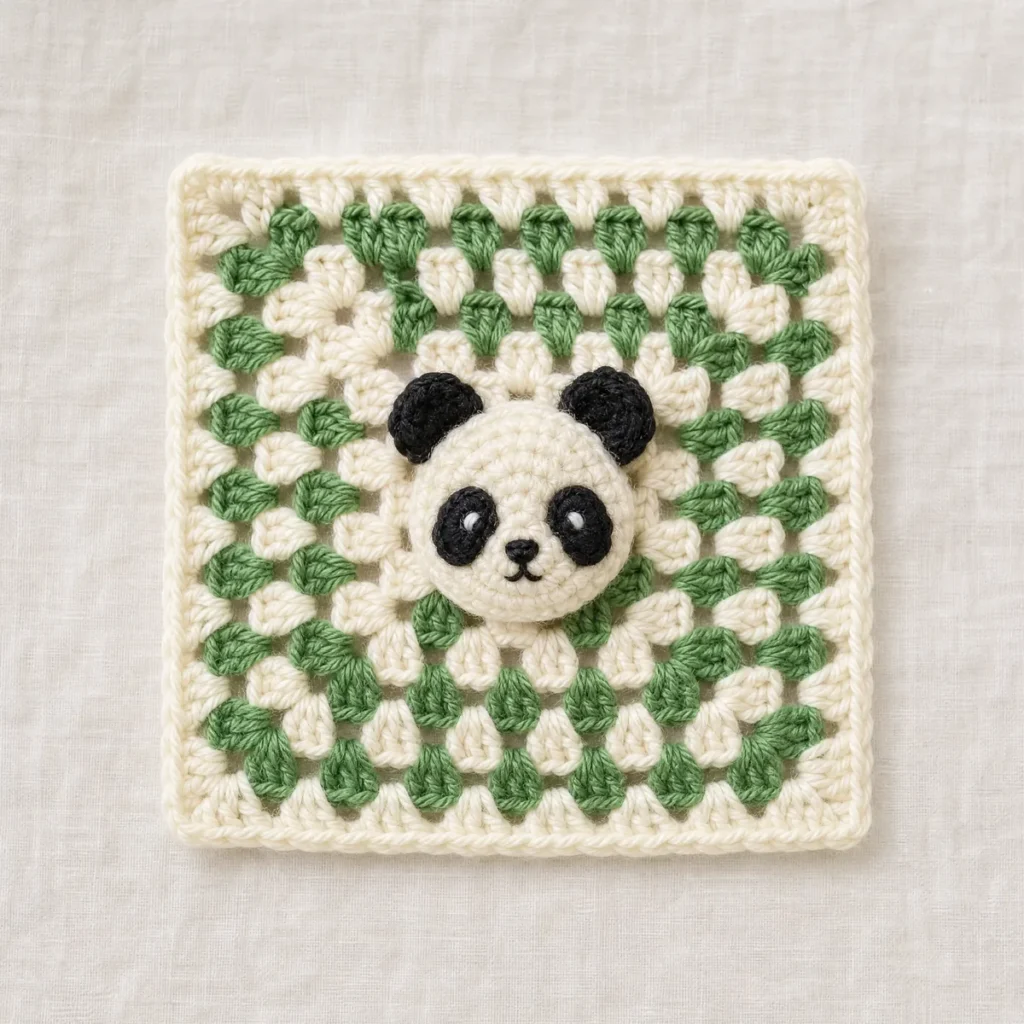
Meet Paige the Panda, a cuddly appliqué square in cream, leaf green, and soft black. Five easy rounds plus a border make this a sweet beginner project.
Level BeginnerTime 45-60 MinutesHook 5.0 mmYarn Worsted
About This Pattern
Paige the Panda is a classic granny square dressed up with a pictorial twist: a round panda face, two little ears, soft black eye patches, and a tiny bamboo leaf all sewn onto a traditional corner-increase background. She keeps the comforting rhythm of a granny square but adds a face you'll want to look at every time you glance at your blanket.
The background works up in the familiar granny square technique, with dc corner increases building outward in cream and leaf green, finished with a cream sc border. The panda pieces are small, satisfying appliqués worked separately, so you get variety in your stitching without any tricky shaping. It's a lovely square for beginners who've learned the basics and are ready to try their first pictorial piece, and for confident crocheters who want a quick, cheerful make.
Finished, Paige sits at about 6 x 6 inches with her face peeking out against the cream and green background, round-eared and a little bit sleepy-eyed. She's an especially sweet choice for a baby blanket, either scattered among plain squares as a surprise or repeated for a full panda-themed throw, and she works just as nicely as a stand-alone cushion front or a nursery wall hanging.
Variations
Paige is easy to make your own once you know the basic shape. Try swapping the leaf green background for soft blue or blush pink and keep the panda's cream, green, and black as they are, so she still reads clearly against a new backdrop. If you want a jumbo square for a lovey or cushion front, go up to a bulky yarn and a 6.0 mm hook, or work several in worsted weight and join them into a nursery blanket. You can also change her personality a little: rounder, shorter ears feel younger, while a larger bamboo leaf gives her more presence. Cotton yarn firms up her features nicely for a wall hanging, while soft acrylic keeps her squeezable for a baby gift. However you style her, the same easy corner-increase rounds carry the whole design.
I fell for Paige the Panda the moment I sewed her round little ears in place and stepped back to look. There is something about a hand-stitched panda face, with her soft black eye patches and that tiny bamboo leaf tucked by one ear, that turns a plain granny square into a keepsake. The background works up in easy dc rounds with simple corner increases, so your hands stay busy while your mind relaxes, and the panda pieces come together with just a handful of stitches each. I love how forgiving the shaping is, too.
Common mistakes
- Losing corner spaces on later rounds
- Always work into the actual ch-2 corner space, not around the chain stitches. Pause after each corner to confirm you still have four ch-2 spaces before continuing.
- Sewing the panda face too flat
- Leave your ears and eye patches lightly stuffed or gently domed rather than pressed flat when you sew them on. A little loft is what gives Paige her friendly, dimensional look.
- Uneven ear and patch placement
- Lay all the panda pieces on the background square and pin them before stitching a single one down. Step back and check the spacing looks balanced from a distance first.
- Skipping a gauge check
- Since Paige relies on appliqué pieces fitting her background neatly, work a quick swatch first to confirm your hook and tension match the pattern gauge.


Beginner
Materials
- Worsted-weight yarn in 3 colors (cream, leaf green, soft black) — about 25–40 g total per square
- 5.0 mm crochet hook
- Yarn needle for weaving in ends
- Scissors
The Background Square
Work the plain background square first — the paige the panda pieces are sewn on at the end. Every count below is math-verified.
- Round 1With cream, in a magic ring: ch 3, 2 dc, ch 2, [3 dc, ch 2] 3 times; sl st to top of ch-3 to join (12)Step by step Step by step: Using cream yarn, in a magic ring: make 3 chain stitches, 2 double crochet, make 2 chain stitches, [3 double crochet, make 2 chain stitches] 3 times; slip stitch to top of ch-3 to join.
- Round 2sl st to corner sp, ch 3, 2 dc, ch 2, 3 dc in same corner, ch 1, [(3 dc, ch 2, 3 dc) in corner sp, ch 1, ] 3 times; sl st to join (24)Step by step Step by step: Slip stitch to corner space, make 3 chain stitches, 2 double crochet, make 2 chain stitches, 3 double crochet in same corner, make 1 chain stitch, [(3 double crochet, make 2 chain stitches, 3 double crochet) in corner space, make 1 chain stitch, ] 3 times; slip stitch to join.
- Round 3With leaf green, sl st to corner sp, ch 3, 2 dc, ch 2, 3 dc in same corner, ch 1, 3 dc, ch 1, [(3 dc, ch 2, 3 dc) in corner sp, ch 1, 3 dc, ch 1, ] 3 times; sl st to join (36)Step by step Step by step: Using leaf green yarn, slip stitch to corner space, make 3 chain stitches, 2 double crochet, make 2 chain stitches, 3 double crochet in same corner, make 1 chain stitch, 3 double crochet, make 1 chain stitch, [(3 double crochet, make 2 chain stitches, 3 double crochet) in corner space, make 1 chain stitch, 3 double crochet, make 1 chain stitch, ] 3 times; slip stitch to join.
- Round 4sl st to corner sp, ch 3, 2 dc, ch 2, 3 dc in same corner, ch 1, 3 dc, ch 1, 3 dc, ch 1, [(3 dc, ch 2, 3 dc) in corner sp, ch 1, 3 dc, ch 1, 3 dc, ch 1, ] 3 times; sl st to join (48)
Step by step Step by step: Slip stitch to corner space, make 3 chain stitches, 2 double crochet, make 2 chain stitches, 3 double crochet in same corner, make 1 chain stitch, 3 double crochet, make 1 chain stitch, 3 double crochet, make 1 chain stitch, [(3 double crochet, make 2 chain stitches, 3 double crochet) in corner space, make 1 chain stitch, 3 double crochet, make 1 chain stitch, 3 double crochet, make 1 chain stitch, ] 3 times; slip stitch to join.
- BorderWith cream, sl st into the corner ch-2 sp, ch 1, [3 sc in the corner sp, (sc in next 3 sts, sc in next sp) 3 times, sc in next 3 sts] 4 times; sl st to the first sc (72)Step by step Step by step: Using cream yarn, slip stitch into the corner ch-2 space, make 1 chain stitch, [3 single crochet in the corner space, (single crochet in next 3 stitches, single crochet in next space) 3 times, single crochet in next 3 stitches] 4 times; slip stitch to the first single crochet.
The Head
Worked in cream. Leave a long tail for sewing.
- Round 16 sc in a magic ring (6)
- Round 2[inc] repeat 6 times (12)
- Round 3[sc, inc] repeat 6 times (18)
The Ears (make 2)
Worked in soft black. Leave a long tail for sewing.
- Round 16 sc in a magic ring (6)
- Round 2[inc] repeat 6 times (12)
The Eye Patches (make 2)
Worked in soft black. Leave a long tail for sewing.
- Round 18 sc in a magic ring (8)
The Bamboo Leaf
Worked in leaf green. Leave a long tail for sewing.
- Round 16 sc in a magic ring (6)
Assembly — Bringing It Together
Step 1 Pin the cream Head piece centered on the granny square background, about 1/3 down from the top edge.
Step 2 Pin the two black Ears along the top edge of the Head, each overlapping the head's edge by about a third of the ear so only the top curve peeks above the face.
Step 3 Pin the two black Eye Patches side by side in the upper-middle of the Head, angled slightly outward like a mask, leaving a cream gap between them for the muzzle.
Step 4 Sew all pieces in place with a whipstitch or running stitch using matching yarn, stuffing lightly is not needed since this is a flat appliqué.
Step 5 Embroider the nose, smile, and pupils as described once all pieces are sewn down.
Step 6 Tack the leaf-green Leaf just beside one ear, angled outward like a little bamboo sprig, for a playful finishing touch.
Embroidery With soft black yarn, work a small satin-stitch oval at the center of the face for the nose, just below where the eye patches meet.
Embroidery With soft black yarn, add a short V-shaped straight stitch under the nose for a simple smile.
Embroidery With soft black yarn, work one small straight stitch or French knot in the center of each black eye patch for the pupil.
Important notes
💡 Gauge: the finished square is about 6 x 6 inches in Worsted weight yarn with a 5.0 mm hook. Tight crocheters can go up half a hook size; loose ones down half.
💡 Color plan: the sample uses cream, leaf green, soft black in round order — change colors with a slip-stitch join in the first stitch of the new round.
💡 Weave in the panda's appliqué yarn tails through the back of the background square as you sew each piece on, so there's nothing left to hide later.
💡 Block your finished square lightly before joining it to others; it squares up the corners and makes Paige's face sit flatter and more even.
FAQ
Do I need to know how to make appliqué pieces before trying this square?
Not at all. Each panda piece, the head, ears, eye patches, and leaf, is worked with the same basic stitches as the background rounds. If you can dc and sc, you can make Paige.
Can I use a different yarn weight for Paige?
Yes, just match your hook to the yarn weight you choose. A bulkier yarn will give you a larger, cozier square, while a finer yarn makes a daintier one, so keep the appliqué pieces in the same proportion.
How do I attach the panda pieces to the background square?
Pin the head, ears, eye patches, and leaf in place first to check the layout, then whipstitch or sew each piece down with a length of matching yarn and a yarn needle.
Is this square good for joining into a blanket with plain granny squares?
Absolutely. Paige's finished size and color palette are designed to sit comfortably alongside classic granny squares, so she makes a charming accent square in a larger blanket.
What skill level is this pattern really suited for?
It's written for beginners who already know single and double crochet. The rounds follow a simple, repeating corner-increase pattern, and the appliqué pieces are small and forgiving to work.
Made your own square?
This site belongs to every crocheter. Share your design with the world — we’ll math-check the counts, polish it up, and publish it free for everyone, credited to you.
🧵 Share your pattern →
0 / 0 rounds