
Free Pattern
Step-by-Step
Crochet
Granny SquaresSunshine Lemon Granny Square — A Cheerful Citrus Appliqué
Stitch a plump little lemon granny square in cream, white, lemon yellow, and leaf green — six beginner-friendly rounds plus a cheerful leaf appliqué.
Level BeginnerTime 1-1.5 HoursHook 5.0 mmYarn Worsted
About This Pattern
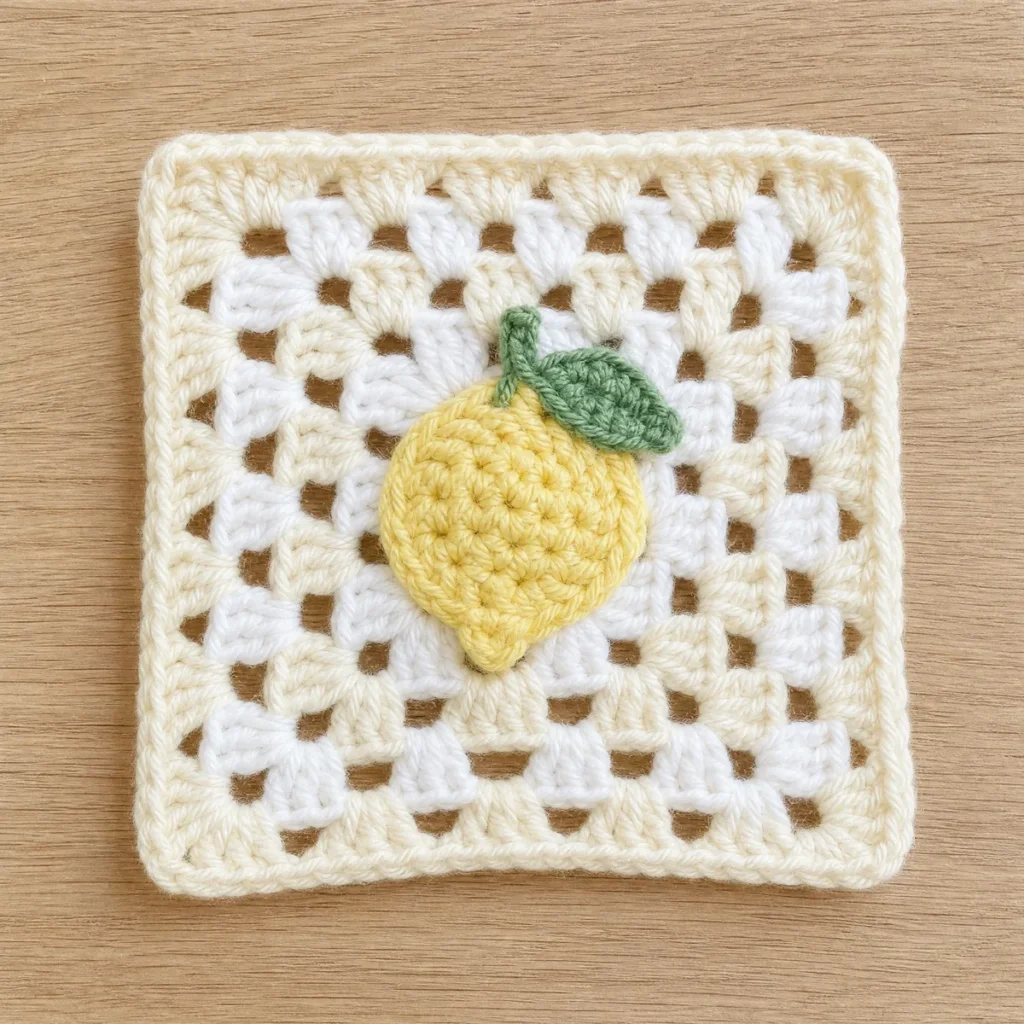
The Sunshine Lemon Granny Square is a classic granny square base dressed up with a plump little lemon appliqué — a rounded lemon body, one perky leaf, and a bright highlight stitched separately and sewn on top. It's the kind of square that turns a plain stack of grannies into something with a story, perfect for scattering through a mixed blanket or brightening a basket of ordinary color work.
You'll work the background in soft, traditional granny rounds — corner clusters, chain spaces, and a tidy single crochet border — while the lemon pieces are small, quick makes worked in their own separate rounds before you stitch them into place. Because every round is spelled out clearly and the stitch count stays gentle, this square suits beginners who've mastered the basic granny square and want to try their first bit of appliqué, as well as more experienced crocheters looking for a fast, cheerful project.
Finished, the square measures about 7 x 7 inches, with the lemon perched wherever you like to sew it on, tucked in a corner or set front and center. Make one as a little accent for your project basket, stitch a handful for a sunny garland, or work up a whole set to piece into a citrus-themed throw that feels sunny no matter the weather outside.
Variations
This one is so much fun to play with once you've made the original. Swap the lemon yellow for a soft orange or blush pink and you've got a completely different little fruit or flower center. Try working the background rounds in a single color for a quieter, more subtle look, or use scraps for every round so each square in your blanket comes out one of a kind. A finer cotton yarn and a smaller hook turn this into a sweet little coaster, while chunky yarn and a bigger hook make a bold, oversized square perfect for a statement pillow. However you stitch it, keep the lemon appliqué in a color that contrasts with the background so it stays the star of the show.
I designed the Sunshine Lemon because I wanted a granny square that could make me smile even on a gray afternoon. There's something about working that little curved lemon body and watching the leaf take shape that feels almost like a tiny craft project tucked inside a bigger one. I love that the background rounds are pure classic granny square — nothing fussy, nothing you haven't done before — so all your concentration can go toward getting that appliqué just right. And once it's sewn on, the whole square just glows. It's become one of my favorite squares to keep in my project bag for waiting rooms and car rides, because it's small, it's simple, and it never fails to lift my mood.
Common mistakes
- Pulling corner spaces too tight
- If your corner chain-2 spaces get cinched down, later rounds will be hard to work into. Keep your tension relaxed at the corners so the 3-dc groups have room to sit.
- Sewing the appliqué on too early
- Attach the lemon pieces before you block the background and they can pucker the fabric. Block the square flat first, then stitch the appliqué in place.
- Skipping a stitch count check
- It's easy to drift a stitch or two off over six rounds without noticing. Pause at the end of each round and confirm your count before moving on.


Beginner
Materials
- Worsted-weight yarn in 4 colors (cream, white, lemon yellow, leaf green) — about 25–40 g total per square
- 5.0 mm crochet hook
- Yarn needle for weaving in ends
- Scissors
The Background Square
Work the plain background square first — the sunshine lemon pieces are sewn on at the end. Every count below is math-verified.
- Round 1With cream, in a magic ring: ch 3, 2 dc, ch 2, [3 dc, ch 2] 3 times; sl st to top of ch-3 to join (12)Step by step Step by step: Using cream yarn, in a magic ring: make 3 chain stitches, 2 double crochet, make 2 chain stitches, [3 double crochet, make 2 chain stitches] 3 times; slip stitch to top of ch-3 to join.
- Round 2sl st to corner sp, ch 3, 2 dc, ch 2, 3 dc in same corner, ch 1, [(3 dc, ch 2, 3 dc) in corner sp, ch 1, ] 3 times; sl st to join (24)Step by step Step by step: Slip stitch to corner space, make 3 chain stitches, 2 double crochet, make 2 chain stitches, 3 double crochet in same corner, make 1 chain stitch, [(3 double crochet, make 2 chain stitches, 3 double crochet) in corner space, make 1 chain stitch, ] 3 times; slip stitch to join.
- Round 3With white, sl st to corner sp, ch 3, 2 dc, ch 2, 3 dc in same corner, ch 1, 3 dc, ch 1, [(3 dc, ch 2, 3 dc) in corner sp, ch 1, 3 dc, ch 1, ] 3 times; sl st to join (36)Step by step Step by step: Using white yarn, slip stitch to corner space, make 3 chain stitches, 2 double crochet, make 2 chain stitches, 3 double crochet in same corner, make 1 chain stitch, 3 double crochet, make 1 chain stitch, [(3 double crochet, make 2 chain stitches, 3 double crochet) in corner space, make 1 chain stitch, 3 double crochet, make 1 chain stitch, ] 3 times; slip stitch to join.
- Round 4sl st to corner sp, ch 3, 2 dc, ch 2, 3 dc in same corner, ch 1, 3 dc, ch 1, 3 dc, ch 1, [(3 dc, ch 2, 3 dc) in corner sp, ch 1, 3 dc, ch 1, 3 dc, ch 1, ] 3 times; sl st to join (48)
Step by step Step by step: Slip stitch to corner space, make 3 chain stitches, 2 double crochet, make 2 chain stitches, 3 double crochet in same corner, make 1 chain stitch, 3 double crochet, make 1 chain stitch, 3 double crochet, make 1 chain stitch, [(3 double crochet, make 2 chain stitches, 3 double crochet) in corner space, make 1 chain stitch, 3 double crochet, make 1 chain stitch, 3 double crochet, make 1 chain stitch, ] 3 times; slip stitch to join.
- Round 5With cream, sl st to corner sp, ch 3, 2 dc, ch 2, 3 dc in same corner, ch 1, 3 dc, ch 1, 3 dc, ch 1, 3 dc, ch 1, [(3 dc, ch 2, 3 dc) in corner sp, ch 1, 3 dc, ch 1, 3 dc, ch 1, 3 dc, ch 1, ] 3 times; sl st to join (60)
Step by step Step by step: Using cream yarn, slip stitch to corner space, make 3 chain stitches, 2 double crochet, make 2 chain stitches, 3 double crochet in same corner, make 1 chain stitch, 3 double crochet, make 1 chain stitch, 3 double crochet, make 1 chain stitch, 3 double crochet, make 1 chain stitch, [(3 double crochet, make 2 chain stitches, 3 double crochet) in corner space, make 1 chain stitch, 3 double crochet, make 1 chain stitch, 3 double crochet, make 1 chain stitch, 3 double crochet, make 1 chain stitch, ] 3 times; slip stitch to join.
- Bordersl st into the corner ch-2 sp, ch 1, [3 sc in the corner sp, (sc in next 3 sts, sc in next sp) 4 times, sc in next 3 sts] 4 times; sl st to the first sc (88)Step by step Step by step: Slip stitch into the corner ch-2 space, make 1 chain stitch, [3 single crochet in the corner space, (single crochet in next 3 stitches, single crochet in next space) 4 times, single crochet in next 3 stitches] 4 times; slip stitch to the first single crochet.
The Lemon Body
Worked in lemon yellow. Leave a long tail for sewing.
- Round 16 sc in a magic ring (6)
- Round 2[inc] repeat 6 times (12)
- Round 3[sc, inc] repeat 6 times (18)
- Round 4[sc, sc, inc] repeat 6 times (24)
The Leaf
Worked in leaf green. Leave a long tail for sewing.
- Round 1ch 2, 2 sc in 2nd ch from hook (2)
- Round 2ch 1, turn, [inc] repeat 2 times (4)
- Round 3ch 1, turn, sc in next 4 sts (4)
- Round 4ch 1, turn, [dec] repeat 2 times (2)
- Round 5ch 1, turn, dec (1)
The Highlight
Worked in cream. Leave a long tail for sewing.
- Round 15 sc in a magic ring (5)
Assembly — Bringing It Together
Step 1 Weave in all ends on Lemon Body, Leaf, and Highlight, leaving a long tail on each for sewing.
Step 2 Pin the Lemon Body slightly below-center on the background square, leaving open space in the upper corner for the leaf.
Step 3 Whip stitch the Lemon Body flat to the background around its entire outer edge — no stuffing, it stays flat like an appliqué.
Step 4 Pin the Leaf so its base tucks just under the top edge of the Lemon Body, angled like it's growing from the stem end; sew around its edges, leaving the point free for a bit of lift.
Step 5 Pin the Highlight circle onto the upper-left area of the Lemon Body to suggest a gloss spot, and whip stitch it in place around its edge.
Step 6 Finish with the embroidery details, then steam-block the square lightly so the appliqué lies flat.
Embroidery With leaf green yarn, work one straight stitch down the center of the Leaf from base to point to suggest a vein.
Embroidery With cream yarn, add 2-3 short straight stitches at the top of the Lemon Body (the stem end) to suggest blossom texture.
Important notes
💡 Gauge: the finished square is about 7 x 7 inches in Worsted weight yarn with a 5.0 mm hook. Tight crocheters can go up half a hook size; loose ones down half.
💡 Color plan: the sample uses cream, white, lemon yellow, leaf green in round order — change colors with a slip-stitch join in the first stitch of the new round.
💡 Weave in the appliqué's yarn tails as you sew it down — running the needle through a few background stitches first keeps everything secure without added bulk.
💡 Press or steam-block the lemon pieces lightly before attaching them so the curves lie flat against the square instead of curling at the edges.
FAQ
Do I need to know how to crochet an appliqué before trying this square?
No prior appliqué experience is needed — the lemon, leaf, and highlight are each worked in their own small, simple rounds, then sewn on with a yarn needle. If you can work a basic granny square, you can manage the appliqué pieces too.
Can I make this square without the lemon appliqué?
Yes, the background alone works up into a lovely classic granny square on its own. Simply stop after the last background round and add your border, skipping the lemon pieces entirely.
What yarn weight and hook size does this pattern use?
This square is worked in worsted weight yarn with a 5.0 mm hook, which keeps the stitches nice and defined without being fussy to work with.
How do I attach the lemon appliqué to the square?
Once both pieces are finished, pin the lemon in place where you'd like it, then use a yarn needle and matching thread to whipstitch it to the background, tucking in any tails as you go.
Is this square good for a first granny square project?
It's a great step-up project once you know the basics — the background rounds follow the same classic granny square logic beginners learn first, and the appliqué adds just enough of a new skill to keep things interesting without being overwhelming.
Made your own square?
This site belongs to every crocheter. Share your design with the world — we’ll math-check the counts, polish it up, and publish it free for everyone, credited to you.
🧵 Share your pattern →
0 / 0 rounds