
Free Pattern
Step-by-Step
Crochet
Granny SquaresSweet Apple Granny Square — A Cheerful Beginner Crochet Motif
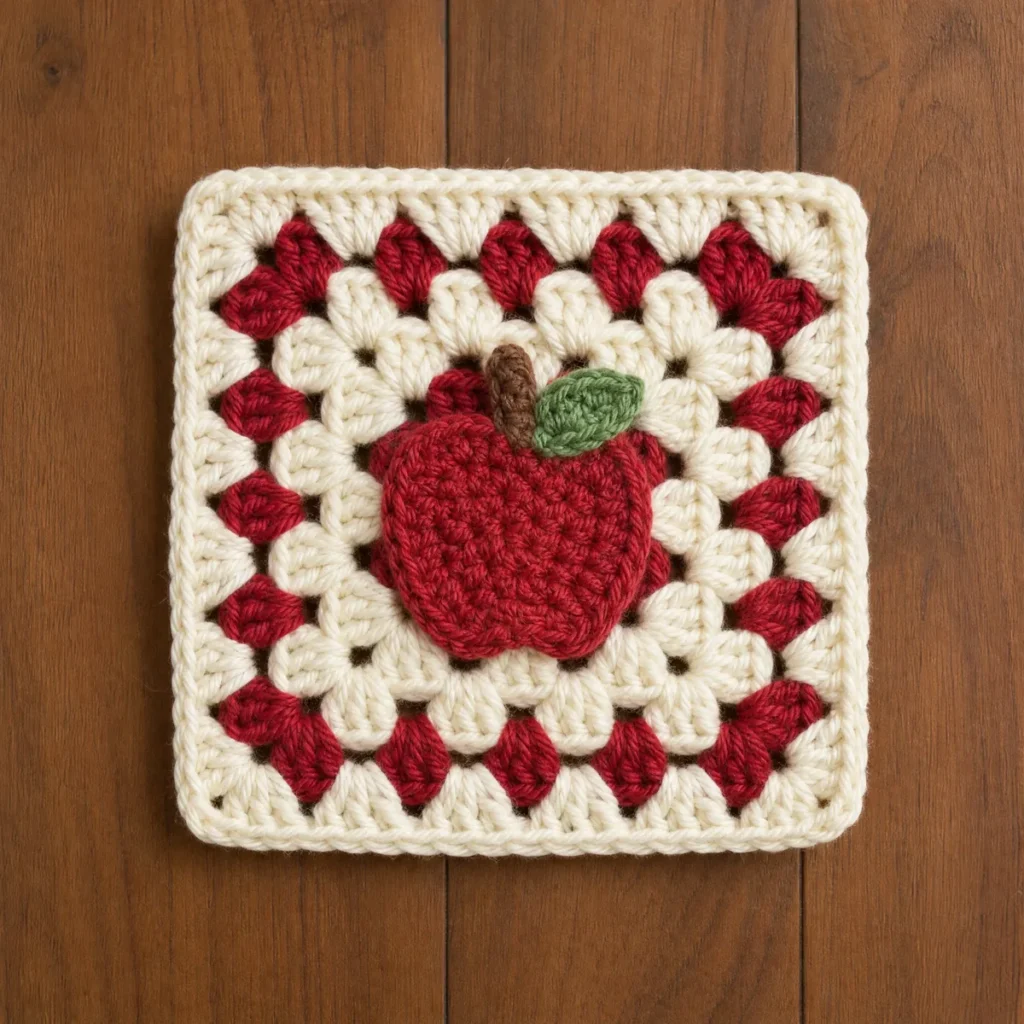
Stitch a rosy Sweet Apple granny square in five easy rounds of cream, apple red, leaf green, and warm brown — a beginner-friendly orchard favorite.
Level BeginnerTime 45-60 MinutesHook 5.0 mmYarn Worsted
About This Pattern
The Sweet Apple Granny Square is one of my favorite pictorial motifs — a plump, rosy apple, complete with a jaunty stem and leaf, stitched separately and then sewn onto a classic granny background. It's the kind of square that makes you smile every time you spot it in a finished project, like it was plucked straight from an orchard and tucked into your stitches.
The background works up in the familiar granny square rhythm: a magic ring start, corner chain-2 spaces, and rounds of three-double-crochet groups that build outward in cream, apple red, leaf green, and warm brown, finished with a tidy single crochet border. The apple, stem, and leaf are small appliqué pieces you stitch on their own and sew into place, so if you've made a handful of granny squares and are ready to try a bit of shaping, this one is a friendly next step.
Finished, the square measures about 6 x 6 inches with the apple sitting proudly at its center against the soft cream background. It's a lovely candidate for a fruit-themed blanket, a set of coordinating coasters, or a single framed square to brighten a kitchen wall — anywhere you want a little handmade orchard charm.
Variations
This design is wonderfully easy to play with once you've made one. Swap the apple red for a golden yellow or blush pink to stitch a different variety, or try a deeper green for the leaf if you want more contrast against the cream background. You could also change the background color from cream to a soft butter yellow or pale gray for a different mood, keeping the apple, stem, and leaf in their true-to-life shades so the motif still reads clearly. If you'd like a larger finished square, work it in a bulkier yarn with a larger hook, or add a plain extra round or two in cream after the border for a wider frame. A whole blanket of these in mixed apple colors makes a wonderful orchard-inspired throw.
I designed this square on a whim one afternoon when I wanted something cheerful to break up a stack of solid granny squares, and the little apple appliqué won me over instantly. There's something so satisfying about stitching a tiny round apple body, adding its stem and leaf, and then watching it settle onto the background like it always belonged there. It's a small project, but it teaches you a real skill — sewing a shaped piece onto a motif — without any pressure, since the background square is pure beginner-friendly granny rhythm. I love pulling this one out when I want a project that finishes fast but still feels like I made something with a bit of personality and heart.
Common mistakes
- Pulling corner chain-2 too tight
- If your corner spaces cinch up, the square will cup instead of lying flat. Keep those ch-2 spaces relaxed so the next round's stitches can nestle in easily.
- Losing track of stitch counts
- With three double crochets bunched at every corner, it's easy to miscount. Pause after each round and check your total against the number given before moving on.
- Sewing the appliqué pieces crookedly
- Take a moment to center the apple body before tacking down the stem and leaf. Pinning or basting the pieces in place first makes the final placement much neater.
- Weaving in apple ends too early
- Wait until the appliqué is fully sewn onto the background before trimming and weaving in the tail ends. That way you can still adjust the placement if something looks off-center.


Beginner
Materials
- Worsted-weight yarn in 4 colors (cream, apple red, leaf green, warm brown) — about 25–40 g total per square
- 5.0 mm crochet hook
- Yarn needle for weaving in ends
- Scissors
The Background Square
Work the plain background square first — the sweet apple pieces are sewn on at the end. Every count below is math-verified.
- Round 1With cream, in a magic ring: ch 3, 2 dc, ch 2, [3 dc, ch 2] 3 times; sl st to top of ch-3 to join (12)Step by step Step by step: Using cream yarn, in a magic ring: make 3 chain stitches, 2 double crochet, make 2 chain stitches, [3 double crochet, make 2 chain stitches] 3 times; slip stitch to top of ch-3 to join.
- Round 2sl st to corner sp, ch 3, 2 dc, ch 2, 3 dc in same corner, ch 1, [(3 dc, ch 2, 3 dc) in corner sp, ch 1, ] 3 times; sl st to join (24)Step by step Step by step: Slip stitch to corner space, make 3 chain stitches, 2 double crochet, make 2 chain stitches, 3 double crochet in same corner, make 1 chain stitch, [(3 double crochet, make 2 chain stitches, 3 double crochet) in corner space, make 1 chain stitch, ] 3 times; slip stitch to join.
- Round 3With apple red, sl st to corner sp, ch 3, 2 dc, ch 2, 3 dc in same corner, ch 1, 3 dc, ch 1, [(3 dc, ch 2, 3 dc) in corner sp, ch 1, 3 dc, ch 1, ] 3 times; sl st to join (36)Step by step Step by step: Using apple red yarn, slip stitch to corner space, make 3 chain stitches, 2 double crochet, make 2 chain stitches, 3 double crochet in same corner, make 1 chain stitch, 3 double crochet, make 1 chain stitch, [(3 double crochet, make 2 chain stitches, 3 double crochet) in corner space, make 1 chain stitch, 3 double crochet, make 1 chain stitch, ] 3 times; slip stitch to join.
- Round 4sl st to corner sp, ch 3, 2 dc, ch 2, 3 dc in same corner, ch 1, 3 dc, ch 1, 3 dc, ch 1, [(3 dc, ch 2, 3 dc) in corner sp, ch 1, 3 dc, ch 1, 3 dc, ch 1, ] 3 times; sl st to join (48)
Step by step Step by step: Slip stitch to corner space, make 3 chain stitches, 2 double crochet, make 2 chain stitches, 3 double crochet in same corner, make 1 chain stitch, 3 double crochet, make 1 chain stitch, 3 double crochet, make 1 chain stitch, [(3 double crochet, make 2 chain stitches, 3 double crochet) in corner space, make 1 chain stitch, 3 double crochet, make 1 chain stitch, 3 double crochet, make 1 chain stitch, ] 3 times; slip stitch to join.
- BorderWith cream, sl st into the corner ch-2 sp, ch 1, [3 sc in the corner sp, (sc in next 3 sts, sc in next sp) 3 times, sc in next 3 sts] 4 times; sl st to the first sc (72)Step by step Step by step: Using cream yarn, slip stitch into the corner ch-2 space, make 1 chain stitch, [3 single crochet in the corner space, (single crochet in next 3 stitches, single crochet in next space) 3 times, single crochet in next 3 stitches] 4 times; slip stitch to the first single crochet.
The Apple Body
Worked in apple red. Leave a long tail for sewing.
- Round 16 sc in a magic ring (6)
- Round 2[inc] repeat 6 times (12)
- Round 3[sc, inc] repeat 6 times (18)
- Round 4[2 sc, inc] repeat 6 times (24)
The Stem
Worked in warm brown. Leave a long tail for sewing.
- Round 1ch 4, sc in 2nd ch from hook, 2 sc in next 2 chs (3)
- Round 2ch 1, turn, sc in next 3 sts (3)
The Leaf
Worked in leaf green. Leave a long tail for sewing.
- Round 1ch 2, turn, 2 sc in 2nd ch from hook (2)
- Round 2ch 1, turn, [inc] repeat 2 times (4)
- Round 3ch 1, turn, sc in next 4 sts (4)
- Round 4ch 1, turn, [dec] repeat 2 times (2)
- Round 5ch 1, turn, dec (1)
Assembly — Bringing It Together
Step 1 Weave in all ends on the Apple Body, Stem, and Leaf, and lightly steam-block the Apple Body so it lies flat and round.
Step 2 Pin the Apple Body centered on the background square, leaving a little extra space above center for the stem and leaf.
Step 3 Pin the Stem vertically at the top-center of the apple, tucking its bottom edge just under the top of the circle.
Step 4 Pin the Leaf beside the stem's base, angled slightly to one side so its point overlaps the stem and its base grazes the apple top.
Step 5 Using matching-color yarn or thread, whipstitch or backstitch around the outer edge of each piece to sew it flat onto the background, working the Apple Body first, then the Stem, then the Leaf on top.
Step 6 Add the embroidery details last, once all pieces are secured.
Embroidery With a short strand of white or cream yarn, work 2-3 small diagonal straight stitches on the upper-left of the apple body for a glossy highlight.
Embroidery With a short strand of leaf green, work one straight stitch down the center of the leaf to suggest a vein.
Embroidery With a short strand of warm brown, work one small straight stitch where the stem meets the apple top to blend the seam.
Important notes
💡 Gauge: the finished square is about 6 x 6 inches in Worsted weight yarn with a 5.0 mm hook. Tight crocheters can go up half a hook size; loose ones down half.
💡 Color plan: the sample uses cream, apple red, leaf green, warm brown in round order — change colors with a slip-stitch join in the first stitch of the new round.
💡 Block the background square lightly before sewing on the apple pieces — a flat, even base makes the appliqué sit much more neatly.
💡 Stitch the apple, stem, and leaf with the same hook and yarn weight as the background so the pieces match in scale and thickness.
FAQ
Do I need any special skills to make the apple appliqué?
No — the appliqué pieces use the same basic stitches as the background square. The only new skill is sewing the finished pieces onto the motif, which just takes a needle and a little patience.
What size hook and yarn does this square use?
This pattern is written for worsted weight yarn with a 5.0 mm hook, which gives the finished square a nice, sturdy drape at about 6 x 6 inches.
Can I use different colors for the apple?
Absolutely — swap the apple red for any shade you like, from a golden yellow to a blush pink, and the motif will still read clearly as an apple as long as the leaf and stem stay a contrasting color.
How do I attach the apple pieces to the background?
Once all the pieces are stitched and your ends are ready to weave in, simply pin the apple, stem, and leaf onto the background square and sew around the edges with a yarn needle and matching thread or yarn.
Is this square good for a themed blanket?
Yes, it's a lovely addition to a fruit or orchard-themed blanket, and it also looks charming mixed in with plain granny squares for a bit of playful contrast.
Made your own square?
This site belongs to every crocheter. Share your design with the world — we’ll math-check the counts, polish it up, and publish it free for everyone, credited to you.
🧵 Share your pattern →
0 / 0 rounds