Free Pattern
Step-by-Step
Crochet
WearablesHow to Crochet a Granny Square Cardigan
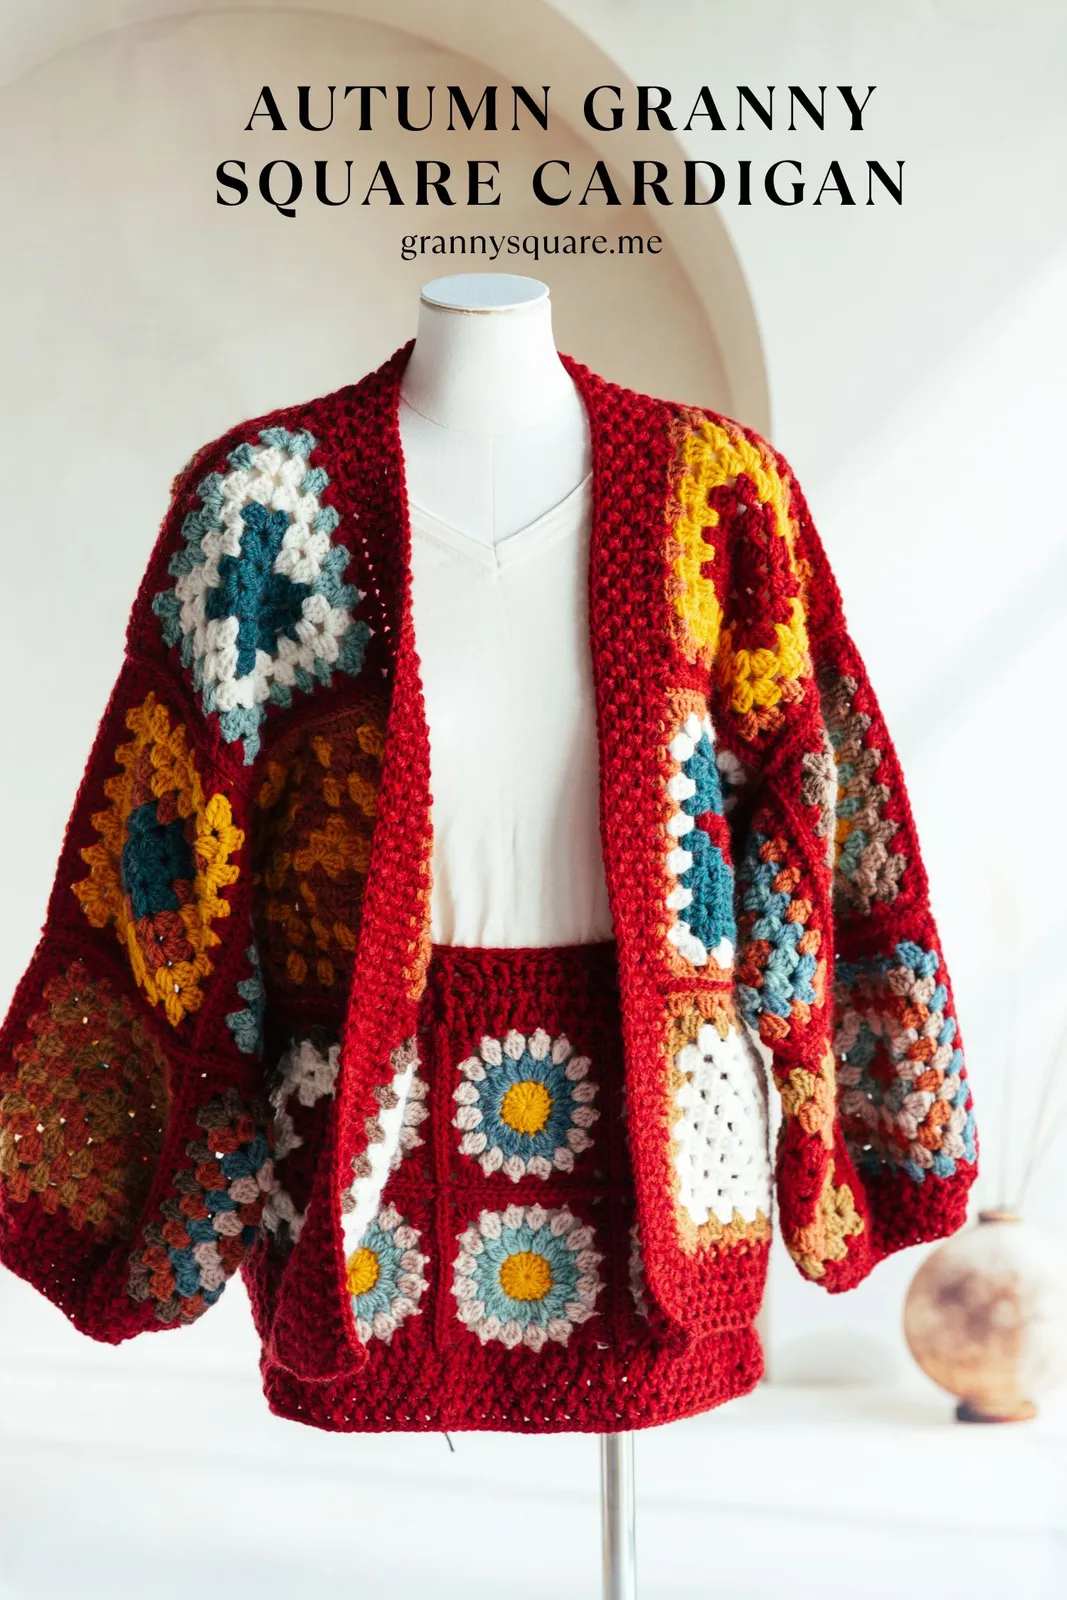
Crochet a cozy granny square cardigan from 27 colorful squares in DK yarn with a 5mm hook — full pattern, joining steps, edging, and two cuff options
Level IntermediateTime About 45 HoursHook 5.00 mmYarn DK
About This Pattern
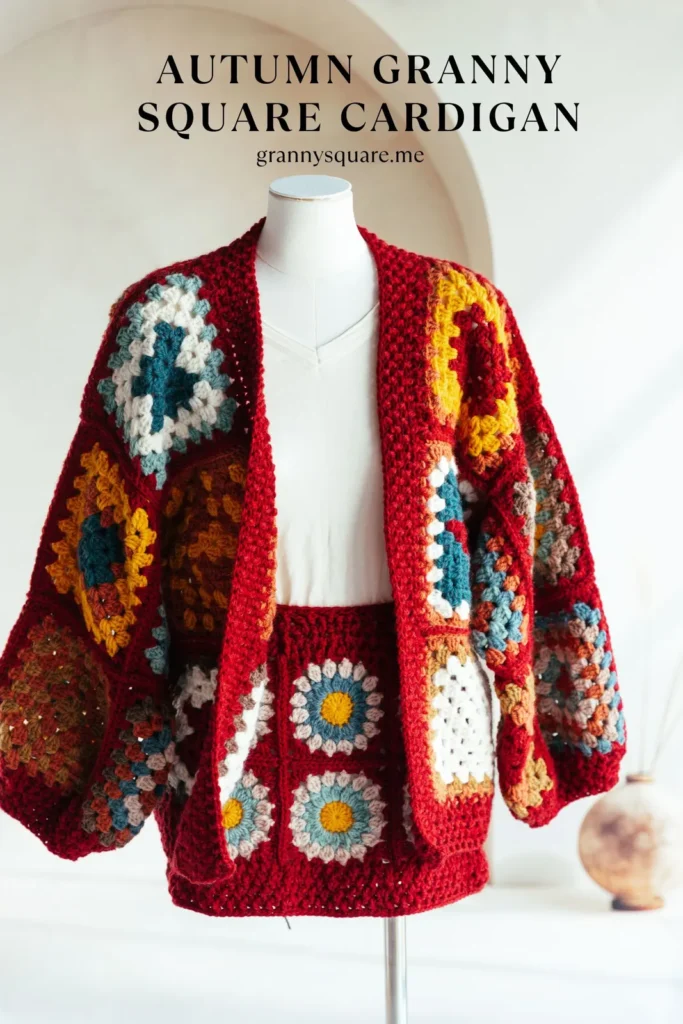
This pattern turns 27 cheerful granny squares into a full, wearable cardigan you'll reach for from the first cool morning of autumn onward. Each square repeats the same simple round from the center out (the sample stops at Round 7), so no single piece ever feels overwhelming — the magic is in the mix of eleven colors, anchored by a solid red background that ties every square together like a patchwork of maple leaves. It's perfect for crocheters who love portable, pick-up-and-put-down projects and want a first garment built from familiar motifs rather than complicated shaping
Skill-wise, this sits comfortably at intermediate. You'll start each square with a magic loop, work classic 3-dc granny clusters, and learn one clever trick worth keeping forever: joining with a ch1 plus hdc instead of a slip stitch when you're not changing colors, which lies flat, creates a nearly invisible seam, and lands your hook right in the corner where the next round begins. Beyond the squares there are four small connecting parts — bottom edge, front opening, and two cuff options — and a step-by-step assembly section. Plan for roughly 45 hours total — I spread mine over a week of evenings, and it never once felt like a race
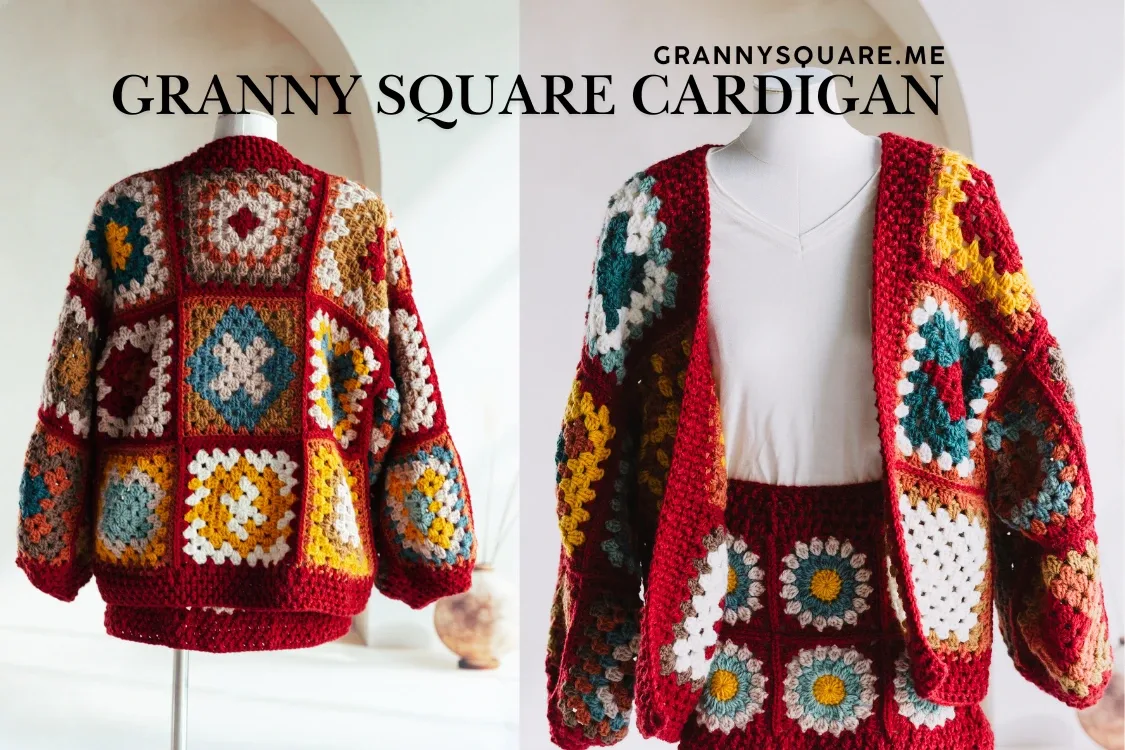
The finished cardigan has a loose, relaxed fit thanks to the 5.00mm hook paired with DK weight yarn — all the warmth of a heavier sweater without the bulk, and lovely drape through the body and sleeves. In the red, orange, and brown palette it reads unmistakably autumnal, while small pops of yellow, white, and light blue keep it playful rather than heavy. It's a genuine statement piece you'll be asked about every time you wear it, and a heartfelt gift — though fair warning, you may not want to give it away
Variations
I made this cardigan bit by bit during stolen pockets of free time, and that's exactly what I love most about it: 27 squares — each worked in the same easy repeating round — means every single sitting ends with a finished piece in your hands. There's real satisfaction in pulling that magic loop tail tight and watching a perfect center appear, and the ch1-plus-hdc join is one of those small techniques that makes you feel like a smarter crocheter forever after — your hook lands exactly in the corner for the next round, no awkward slip-stitching across the top. I also adore the color play. With red as the constant background, no two squares need to match, so choosing each new combination of orange, brown, mustard, or steel blue feels like a tiny creative decision rather than a chore. By the time you reach the assembly steps, you've got a stack of squares that looks like autumn leaves piled on a table — and watching them become an actual garment you can wear is honestly the best part of all 45 hours
Common mistakes
- Leaving the magic loop too loose before
- After working your ch3 and the three repeats of 3dc+ch3 into the loop, pull the tail firmly until the center closes completely, then weave that tail through the backs of the round-one stitches in a circle before trimming. In a garment that gets stretched and worn, an unsecured magic loop will slowly creep open at the center of the square — and with 27 squares, even a few loose centers are very visible
- Replacing round two's ch1 + hdc join
- That substitution is the most common autopilot error in this pattern. The instructions deliberately have you omit the final chains, work only ch1, and join with an hdc into the top of the starting ch3 — the hdc's height stands in for the missing chains AND parks your hook exactly in the corner space where round three begins. If you slip stitch instead, you'll have to slip-stitch across to reach the corner, adding bulk and a visible ridge
- Forgetting that the starting ch3 counts as a dc
- Every round here begins with ch3 counted as the first double crochet, so you work only 2dc beside it to complete a 3-dc corner cluster. Crocheters who add a full 3dc end up with four-stitch clusters that make squares ruffle; those who ignore the ch3 entirely get two-stitch corners that make squares pull inward. Count each cluster as three, including the chain, and always join into the top chain of that ch3
- Working round three's middle clusters
- round three onward, the side clusters go into the gap between two 3-dc groups of the previous round — not into the tops of the stitches themselves. Working into stitches makes the fabric tight and puckered and throws off your counts at the corners. Tilt the square and look for the open space between clusters; your hook should slide in without splitting any yarn
- Trusting your tension to stay identical
- Squares made on different days, in different moods, or with different colors of the same yarn line often come out slightly different sizes — and mismatched squares turn into wavy, puckered seams during assembly. Measure each finished square against your first one, and wet- or steam-block the whole set to a single measurement before you join anything
Intermediate
Materials
- You can use ANY other yarn with ANY other color, but if you like my style and want to replicate one, here are the yarns I used:
- The yarn I chose is the DK weight yarn. This type of yarn offers all the warmth and benefits of worsted-weight yarns, but without the bulk, making it ideal for warm sweaters, scarves, hats, and mittens.
- Note: Each skein = 50g.
- These are approximate figures. To ensure that you can complete the sweater successfully, please prepare a little more yarn than these figures indicate.
Orange-red Yarn
- 5 skeins (250g)
Coral color Yarn
- 3 skeins (150g)
Bright yellow / Beige Yarn
- 2 skeins each (100g each)
White / Light mint / Dark teal / Brown / Mustard / Steel blue / Light brown
- 1 skein each (50g each)
Crochet Hook
- 5.00mm hook — creates a loose and relaxed fit for the finished cardigan, and paired with DK weight yarn suits cozy autumn and winter cardigans perfectly.
Granny Square (a total of 27 pieces — create different looks by changing color combinations)
Make 27This is a very classic granny square pattern for crochet enthusiasts of all levels, as it only requires double crochet, chain stitches, and slip stitches. You can easily adjust the size of your square by freely increasing or decreasing the number of rounds, as each round is crocheted in the same way. I use ch1+hdc to join in the end when I do not change color. This lies flat, creates a nearly invisible seam, and works up quickly.
- Round 1Magic loop, ch3(count as dc), 2dc+ch3 in the loop, [3dc+ch3 in the loop] repeat 3 times, pull the tail tightly, sl st to the top of first ch3, fasten off.
- Round 2Add new color yarn in any corner, ch3(count as dc), 2dc in the same corner, 3dc+ch3 in the next corner; [3dc in the same corner, 3dc+ch3 in the next corner] repeat 3 times, omit the final ch2 and work only ch1, then join with a hdc into the top of the starting ch3.This hdc replaces a sl st, securing the round while keeping your hook at the corner for the next round.
- Round 3ch3 as a standing st(count as dc), 2dc in the same corner, 3dc in next gap between two 3-dc groups, 3dc+ch3 in the next corner; [3dc in the same corner, 3dc in next gap, 3dc+ch3 in the next corner] repeat 3 times, sl st to the top of the first ch3, fasten off.
- Round 4-7For each of the remaining 4 rounds, work 3dc+ch3+3dc in each corner sp, 3dc in each gap between two 3-dc groups. At the beginning of each round, make ch3 as a standing st(count as dc), while at the end, sl st to the top of the first ch3.When not changing colors, use the ch1 + hdc join method described above.
I stopped at Round 7 for a size for average body type. Again, you can make these squares however big you like — just decrease or increase the number of rounds of each square.
All 27 squares use this same basic granny square — you can create completely different looks just by changing colors in a certain round or gap. Try switching yarns after a specific round or within certain spaces. For a simple look, use a new color in each round, or change colors every two rounds.
Edge the Bottom Side
- Row 1Attach yarn in bottom corner. Make an invisible standing st+dc. *[FPdc, BPdc] rep to next two adjacent corners. 1dc in first corner. dc2tog over both corners. dc in second corner*. Rep from * to the last corner. 2dc in the final corner.
- Row 2-4Turn at the beginning, make an invisible standing st(count as dc), FPdc around each BPdc, BPdc around each FPdc, work across the round, and work 1dc in the final st.
Note: Do not skip the decreasing and ordinary dc.
Edge the Front Opening
- Row 1Edge from left to right, new yarn in side st, make invisible standing st, repeat [dc, FPdc] to reach next corner of square, dc in this corner; *repeat (FPdc, BPdc), when reach the seam of two granny squares, dc in first corner, dc dec over the two corners, dc in second corner*;Repeat from * to reach the shoulder where three squares connect: Work a dc3tog across three squares: [1st incomplete dc] in first square’s corner, [2nd incomplete dc] in the BL of the middle st of the center square’s corner, [3rd incomplete dc] in the third square’s corner. Then repeat [FPdc, BPdc].Continue edge in this way, till you reach the last corner of the last square, dc in this corner, repeat [FPdc, dc], dc in the last st.
- Row 2-4Turn, begin with an invisible standing st, FPdc around each BPdc, BPdc around each FPdc. Work up to the last st, work dc in the final st.
Wrist Cuff: Option 1 – Straight Cuff
- Round 1Add new yarn in right corner of any two adjacent corners, make an invisible standing st(count as dc), dc2tog over the two corners, dc in the 2nd corner; Repeat [FPdc, BPdc] for stitches, [dc, dc2tog, dc] for each of the two adjacent corners, work around, sl st to the first invisible standing st.
- Round 2-5Begin with an invisible standing st, FPdc around each BPdc, BPdc around each FPdc (Regular dc and tog stitches also participate in this pattern), sl st to the first st.
Wrist Cuff: Option 2 – Tapered Cuff
- Round 1Repeat Round 1 of the previous straight cuff.
- Round 2ch2 as a standing st, FPdc around the post of the current and next sts to finish a FPdc2tog; Repeat [BPdc2tog, FPdc2tog] around, join to the first st with a sl st.
- Round 3Work FPdc around each BPdc2tog, BPdc around each FPdc2tog. Make ch2 as a standing st at the beginning, and sl st to the first true st at the end.
- Round 4-5Work FPdc around each BPdc, BPdc around each FPdc. At the beginning of each round, make ch3 to start, while at the end, sl st to the first true st.
Assembly
- Step 1This cardigan uses 27 granny squares total: the back panel features 9 squares (3×3 arrangement), each front panel uses 3 squares, and both sleeves require 6 squares each. The front and back panels and two sleeves connect along a seam at the neckline opening.
- Step 2Follow the layout pattern to join these squares. (Note that for the two squares at the bottom of each sleeve near the front opening, only join half of the edge to the front panels. After all other joins are complete, fold the piece in half and seam the remaining half edges of these squares to the back panel.)
- Step 3I use the slip stitch method to join, working only through the back loops of two corresponding stitches from both squares (one from each).
- Step 4Work ch1 to skip over the raised seam from the joining of another direction.
- Step 5Another method is to use a darning needle to sew and connect the squares one by one.
- Step 6Start from the middle chain of any ch-3 corner, insert your hook into the back loops of the two chains, yo, pull up a loop.
- Step 7Insert your hook into the back loop of the next two corresponding stitches on each square.
- Step 8Complete a sl st.
- Step 9Work sl st through the back loop of the next two corresponding stitches.
- Step 10Continue join with slip stitches through the back loop of two corresponding stitches until you reach the middle chain of the next corner. Then begin join the next two squares. Remember, always start and end joins at the middle chain of each corner.
- Step 11When transitioning to a new direction, such as from horizontal to vertical, simply continue in the same manner. But when you reach the raised seam from the previous join of another direction, make ch1 to skip over it, and continue with your joining. This method creates a flat and neat connection.
- Step 12Once all the squares are securely connected, fold the entire piece in half, sew the sleeves, and then connect the front and back panels.
- Step 13Or you can sew the two sleeves first, then attach them to both sides of the cardigan.
Important notes
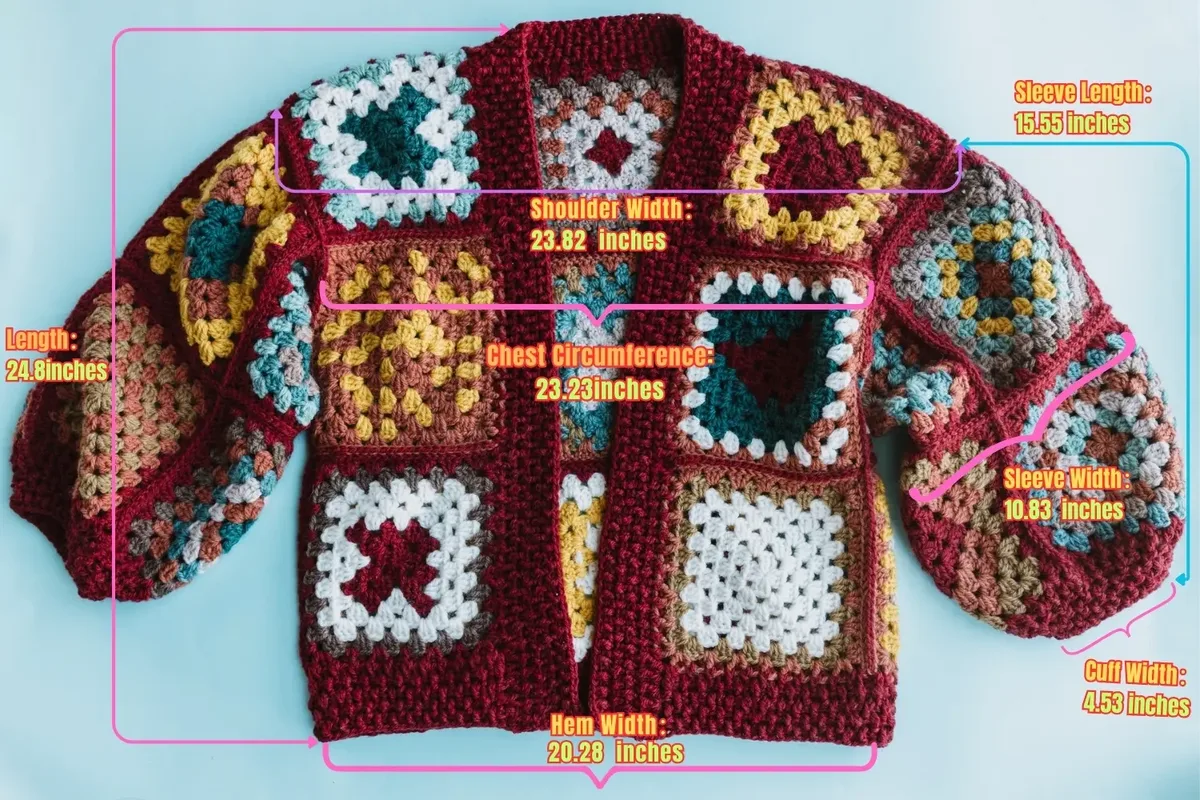
💡 Crochet one complete test square through Round 7 and measure it before starting the batch. Gauge: a single granny square measures 7.48 × 7.48 inches in DK yarn with the 5mm hook — far better to discover a sizing issue after one square than after twenty-seven
💡 Lay all 27 squares out on a bed or floor and photograph the arrangement before assembly. Keep the red background constant but shuffle squares until the yellow, white, and light blue accent squares are evenly scattered — clusters of similar squares in one spot are the number-one reason patchwork garments look unbalanced
💡 Tame the eleven colors with a simple system: keep each shade in its own zip bag or bowl, and wind small bobbins of the accent colors (you only need one 50g skein of seven of them) so you're not wrestling seven full skeins for a few rounds each
💡 Buy your background orange-red first and check dye lots — you need five skeins of it, and a mid-cardigan dye-lot change in the most prominent color will show. The single-skein accent colors are far more forgiving since they never sit side by side
💡 During assembly, place stitch markers in the corner ch-3 spaces of adjoining squares and pin edges together every few clusters before seaming. Granny square edges stretch, and markers keep corners perfectly aligned so the edging and cuffs attach where they should
💡 The sample is a medium (M), designed to fit individuals approximately 1.6–1.7 m (5’3″–5’7″) tall and weighing 50–65 kg (110–143 lbs). To adjust the size, simply increase or decrease the number of rounds in each granny square — the stitch pattern of every round is the same, so the stitch count progression stays uniform. If you prefer a longer cardigan, add granny squares to the bottom of both the front and back panels
More photos
FAQ
How much yarn does this granny square cardigan use in total?
Plan for about 950g of DK weight yarn, or nineteen 50g skeins: five of the orange-red background, three of coral, two each of bright yellow and beige, and one each of white, light mint, dark teal, brown, mustard, steel blue, and light brown. These are approximate figures, so prepare a little extra — especially of the orange-red in the same dye lot, since it appears in every square
Can I adjust the size of this cardigan?
Yes — and it's easy, because the stitch pattern of every round is identical. Increase or decrease the number of rounds in each granny square to change the overall size; the sample stops at Round 7 for a medium (M) that fits roughly 1.6–1.7 m (5’3″–5’7″) and 50–65 kg (110–143 lbs). If you prefer a longer cardigan, add granny squares to the bottom of both the front and back panels. Always measure one finished square first and multiply across the layout so you know your finished dimensions before making all 27
Do I really need all eleven colors?
Not at all — the color count is a style choice, not a structural one. A three-color version with the red background plus two accents keeps the patchwork charm with far less yarn juggling, and a single-color version turns it into an elegant textured cardigan. Just keep the total yardage around 950g of DK
Is this a good first garment project?
It's one of the friendliest garments you can start with, because there's no complicated shaping — just 27 granny squares that repeat the same round, four small connecting parts, and a clear set of assembly steps. If you're comfortable with the magic loop, 3-dc clusters, and joining into chain spaces, you're ready for it
Should I make this in cotton or acrylic yarn?
Both work beautifully — it depends on the season you're crocheting for. A DK-weight cotton gives a breathable, airy fabric ideal for spring days and cool summer evenings; use a hook one size smaller for a crisper, more refined fabric, or the original size (or larger) for a softer, faster-working feel. Wool or acrylic in DK makes the cozier autumn-and-winter version shown here. Whichever you choose, check your square size against the 7.48 × 7.48 inch gauge first
Made your own square?
This site belongs to every crocheter. Share your design with the world — we’ll math-check the counts, polish it up, and publish it free for everyone, credited to you.
🧵 Share your pattern →
0 / 0 rounds